Reposter.app
Reposter.app is the NextJS / MongoDB / Tailwind application with all you need to organize, schedule and share posts on X for free in minutes.
This is a Next.js project bootstrapped with create-next-app.
The key features include:
- Saving posts in the backlog
- Body rewriting through ChatGPT
- Scheduling posts for future publication
- Instantly publishing posts
- Themeable interface
- Mobile-first UI
7 steps ahead
- Setup the repository
- Create a MongoDB instance on Atlas
- Create a Twitter application
- Setup S3 for image upload
- Add support for OpenAI
- Deploy on Vercel
- Create a CRON job
Requirements
Ensure you have the following installed:
- Node.js (LTS recommended, only to run the project locally)
- Git
Cloning the Repository
Clone this repository:
git clone git@github.com:releasysaas/reposter.git
Move to the folder just cloned:
cd reposter
Set your private repository url:
git remote set-url origin git@github.com:<my-github-user>/reposter.git
Set this repository as your upstream fork, so you can pull updates when needed:
git remote add upstream git@github.com:releasysaas/reposter.git
We recommend to watch to the repository, so you know when there's an update. To pull the latest updates, use:
git pull upstream main
In case we change the same files, you will need to resolve the conflicts.
Alternatively, you can cherry-pick changes so to reduce the amount of conflicts across the files.
Installing the Node Modules
Install the Node modules with the following command:
npm i
If you want to run it locally, just type:
npm run dev
Create the local variables
Copy the .env.example file into a .envfile
Below the list of the main variables:
# -----------------------------------------------------------------------------
# NextAuth
# -----------------------------------------------------------------------------
NEXTAUTH_URL=http://localhost:3000
NEXTAUTH_SECRET=uhf3trtertrewter8e7y7fh38rerewt7uc435h3fi347u4rh9394hf

# -----------------------------------------------------------------------------
# X OAuth
# -----------------------------------------------------------------------------
X_OAUTH2_CLIENT_ID=
X_OAUTH2_CLIENT_SECRET=

# -----------------------------------------------------------------------------
# Database URI
# -----------------------------------------------------------------------------
MONGODB_URI=

# -----------------------------------------------------------------------------
# Application Settings
# -----------------------------------------------------------------------------
MAX_ALLOWED_USERS=1
PUBLISH_ENABLED=true
SCHEDULE_SECRET=ehetrhtrewtregdfhtryterjhgfdbhertteruytrythfgsgsf

# -----------------------------------------------------------------------------
# OPENAI (Optional)
# -----------------------------------------------------------------------------
OPENAPI_KEY=
OPENAPI_MODEL=gpt-3.5-turbo

# -----------------------------------------------------------------------------
# S3 SETTINGS (Optional for uploading images)
# -----------------------------------------------------------------------------
S3_UPLOAD_KEY=
S3_UPLOAD_SECRET=
S3_UPLOAD_BUCKET=name-of-s3-bucket
S3_UPLOAD_REGION=us-east-1

# -----------------------------------------------------------------------------
# X V1 API (Optional for uploading images)
# -----------------------------------------------------------------------------
X_CONSUMER_KEY=
X_CONSUMER_SECRET=
X_ACCESS_TOKEN=
X_ACCESS_SECRET=
Create a MongoDB instance on Atlas
Create an account on Atlas. Follow this tutorial to setup a MongoDB instance.
The free tier can be enough to start.
Once created, get the connection string from "Database Deployments" -> "Connect"
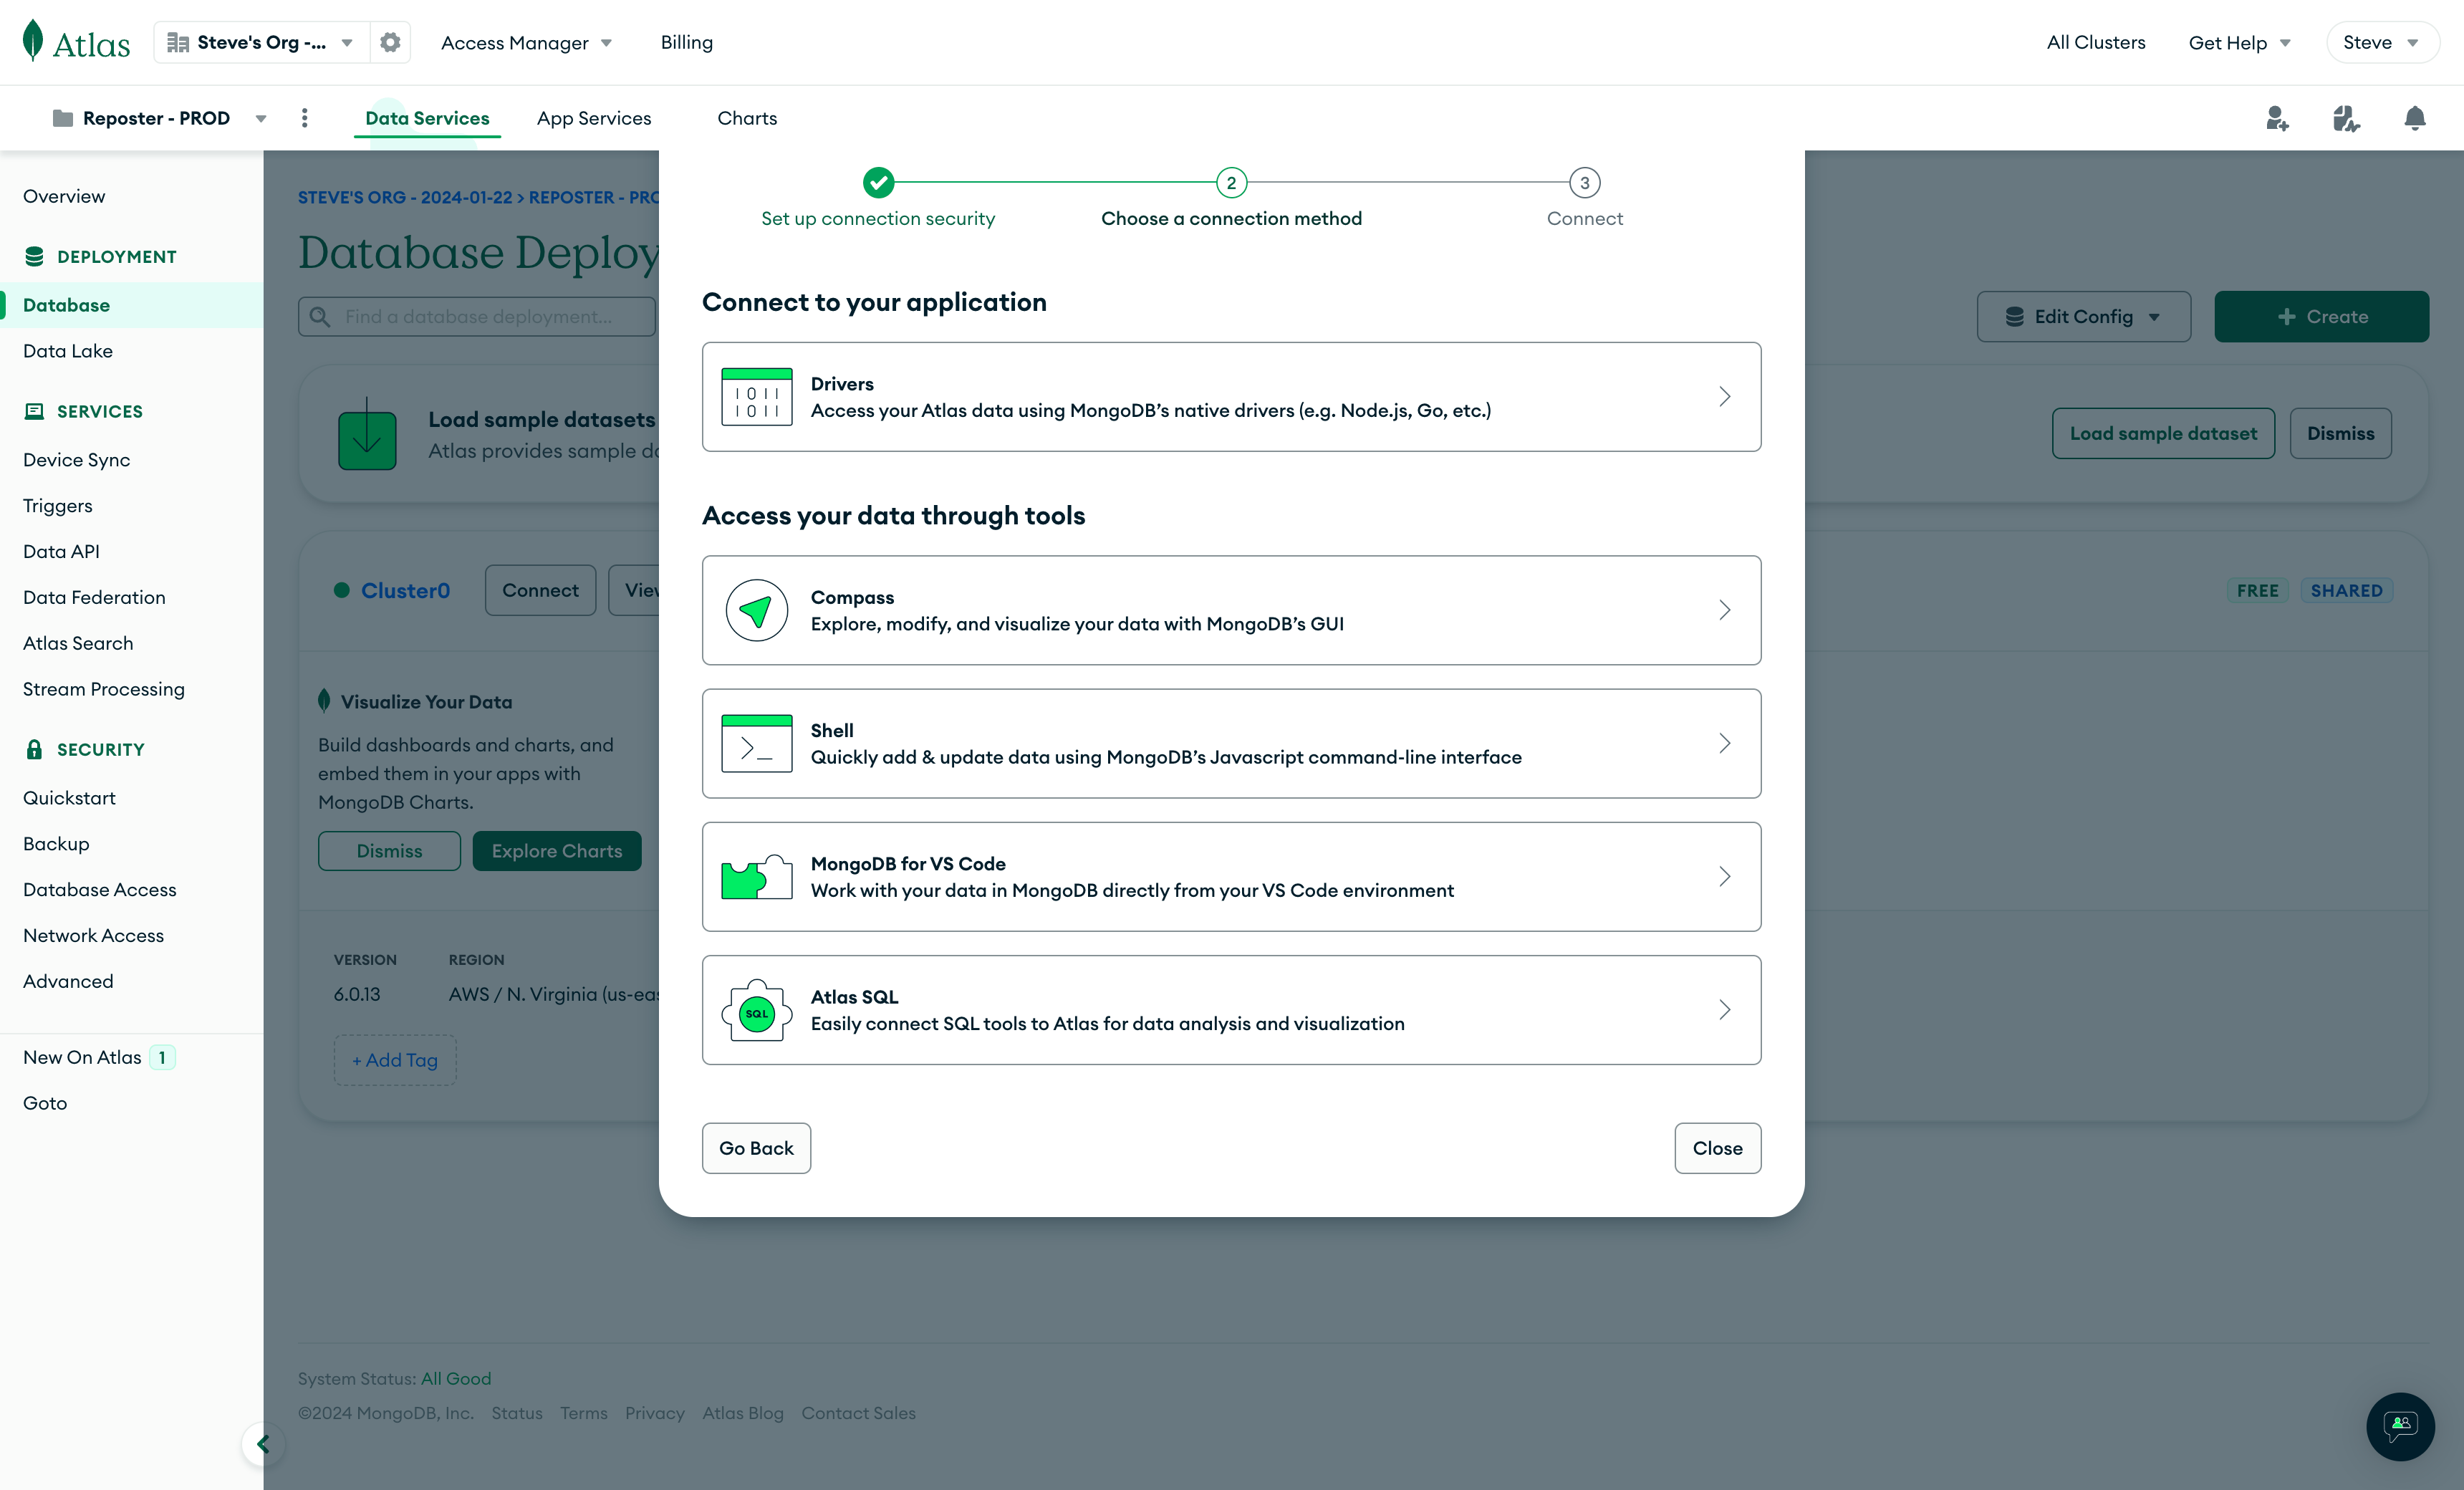
Then click on "Connect to your application" -> Drivers -> "3. Add your connection string into your application code".
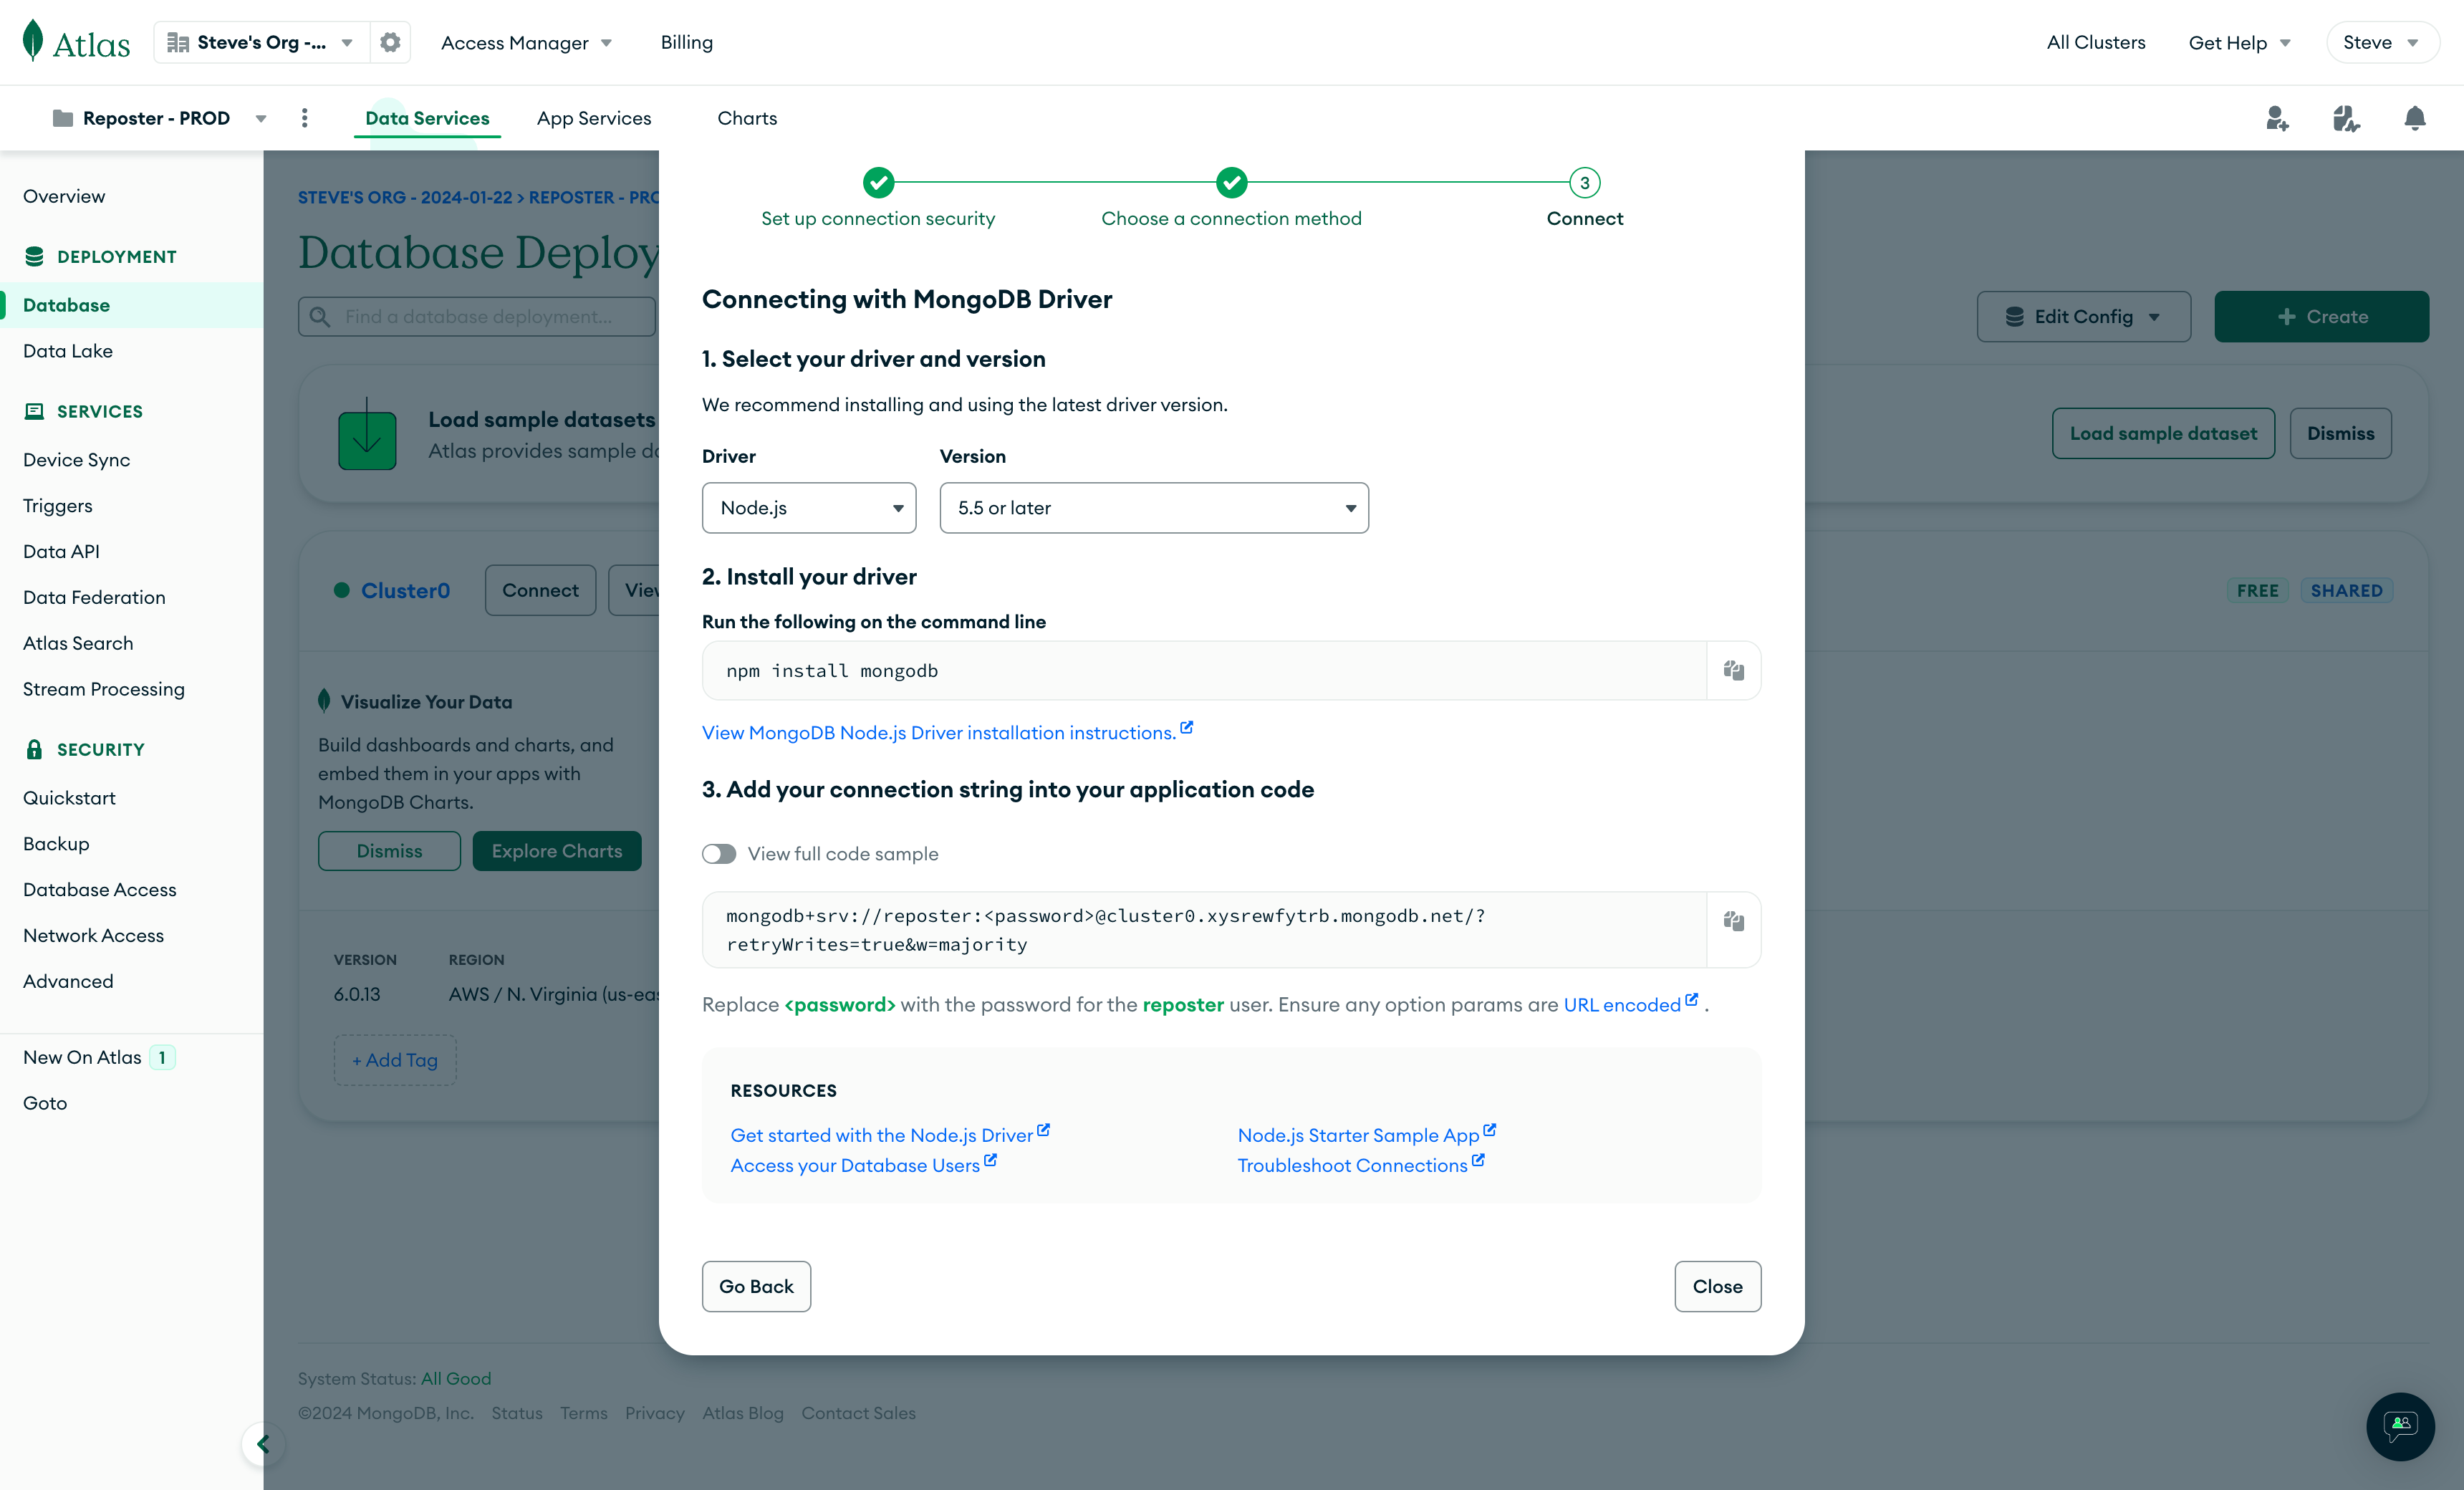
Once you copy the connection string, fill the MONGODB_URI variable in the .env file
Create a Twitter application
Subscribe to the Developer Platform. See this tutorial for a better overview.
Create a new project and a sub application, with access to API v2 and OAuth. Read here for more details.
If you go for the Free plan, remember that you (and all other enabled users in Reposter.app) can only publish 50 requests / 24 hours.
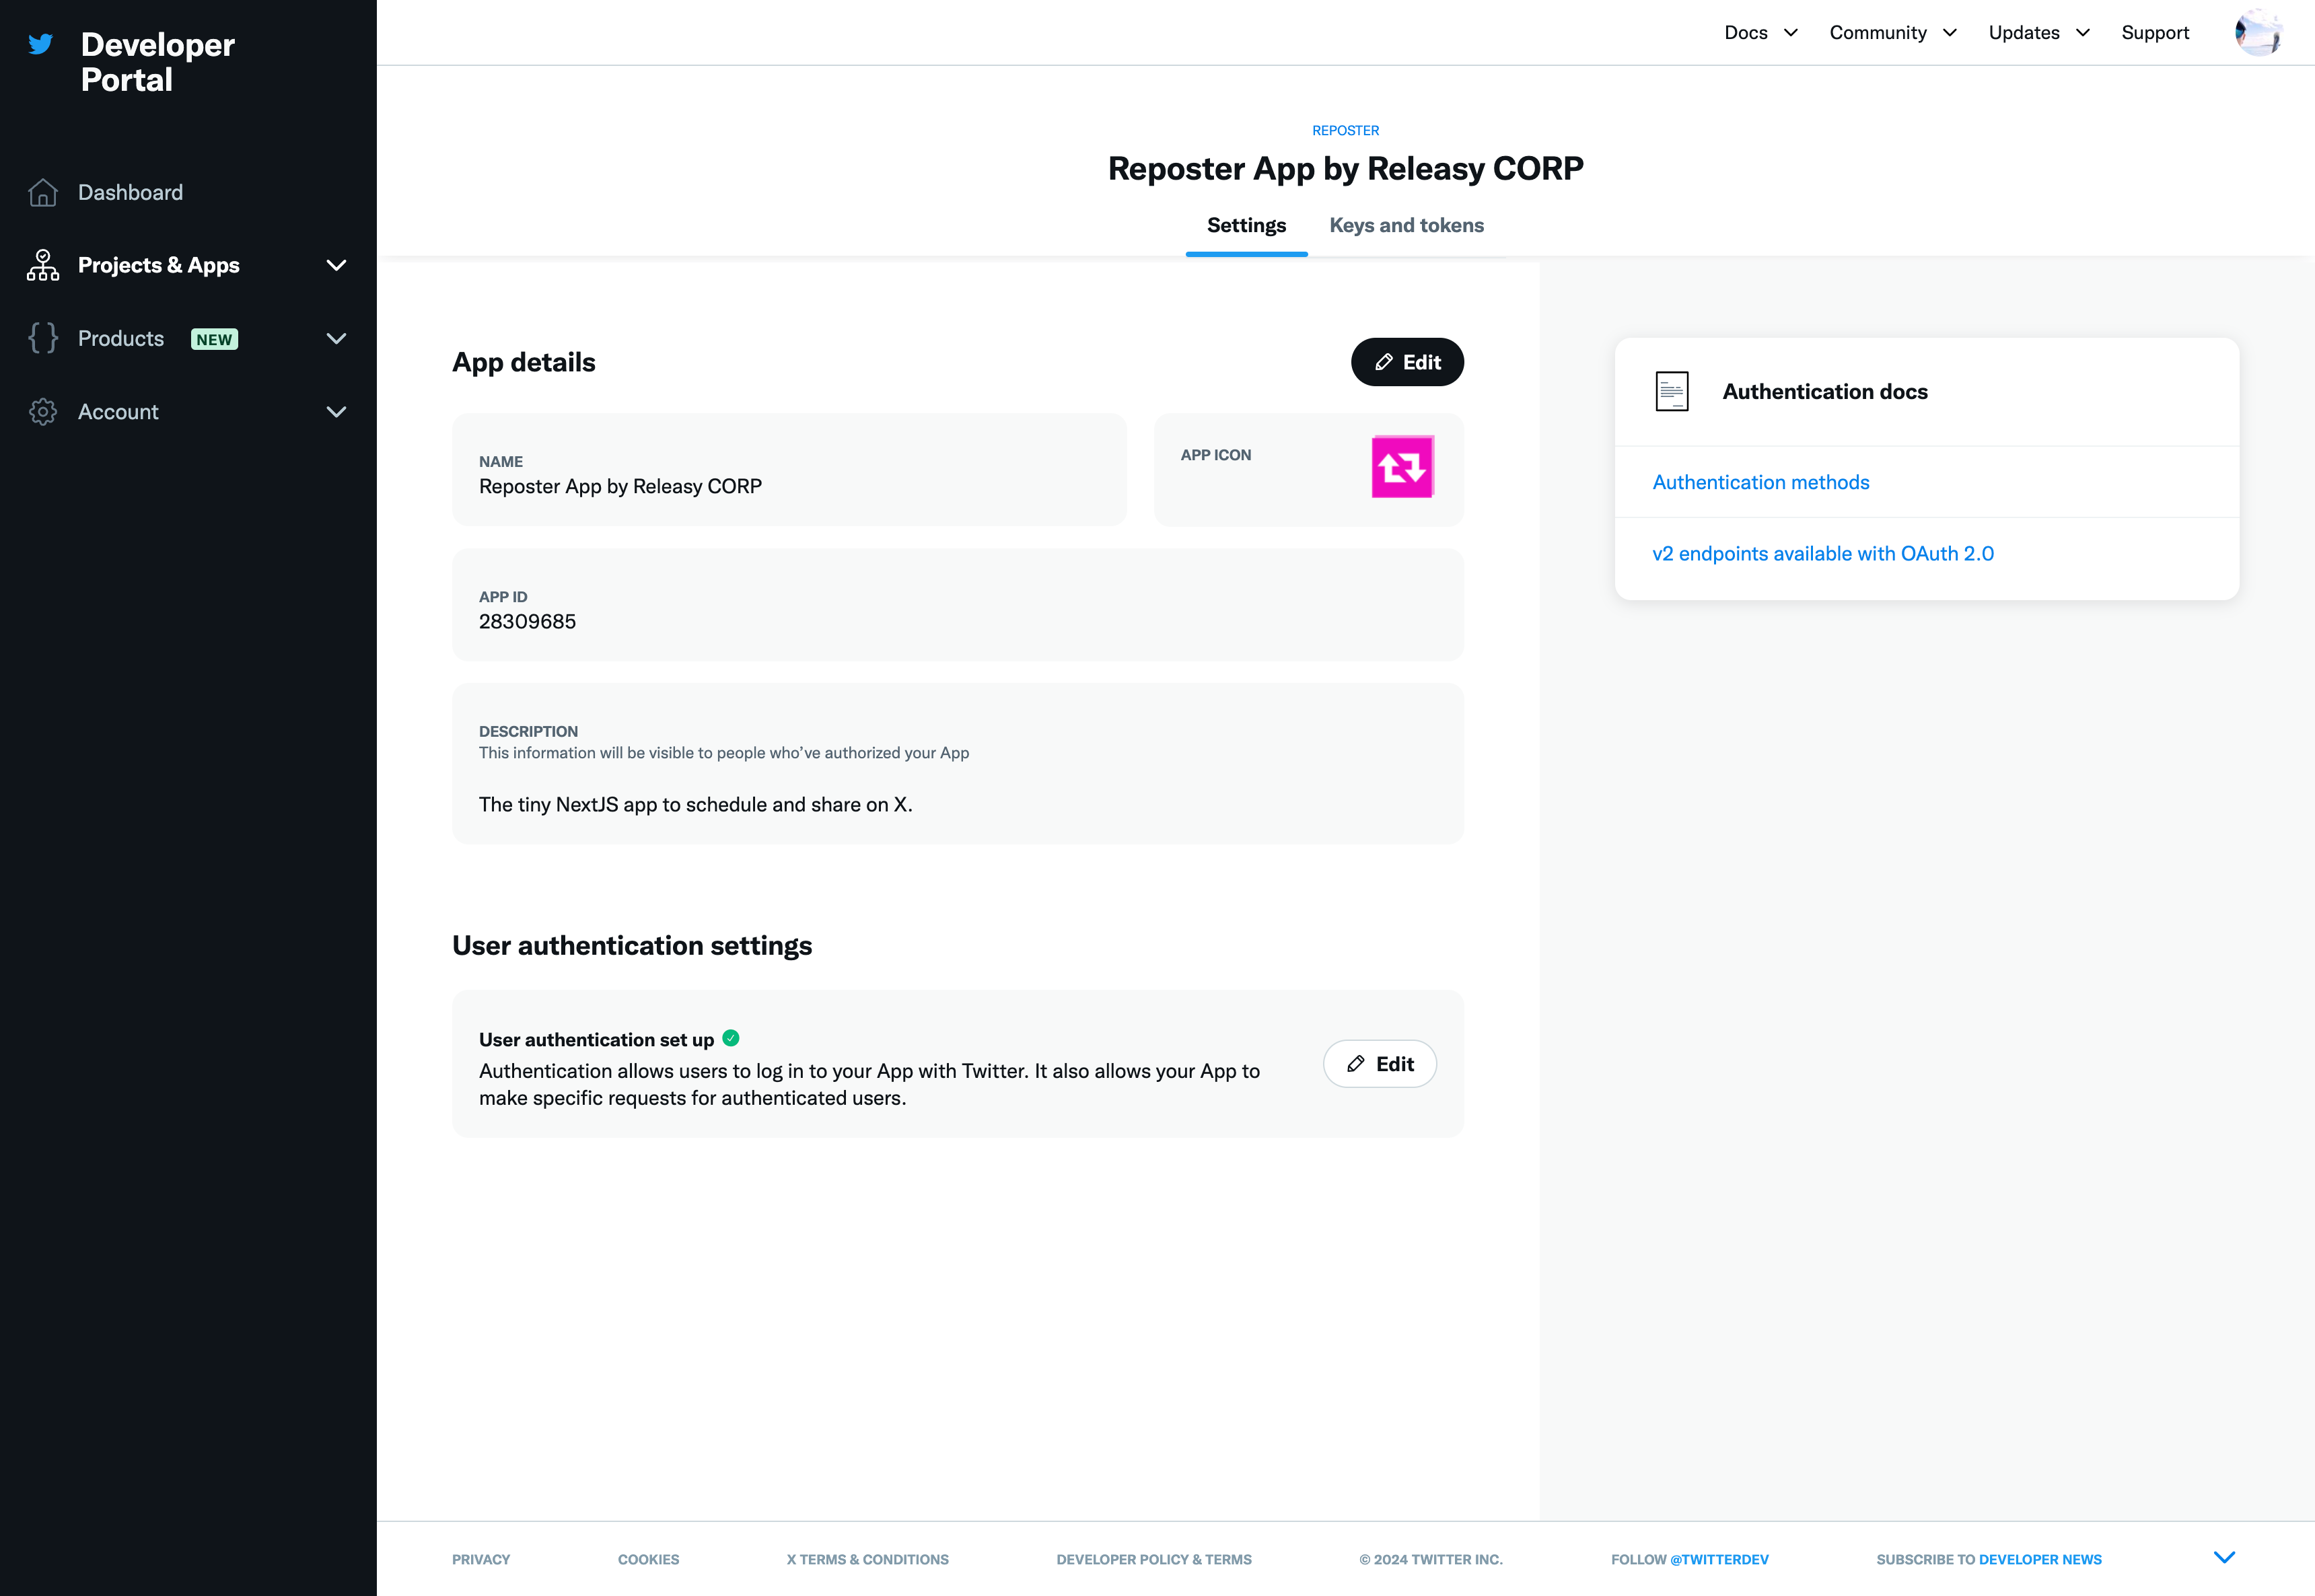
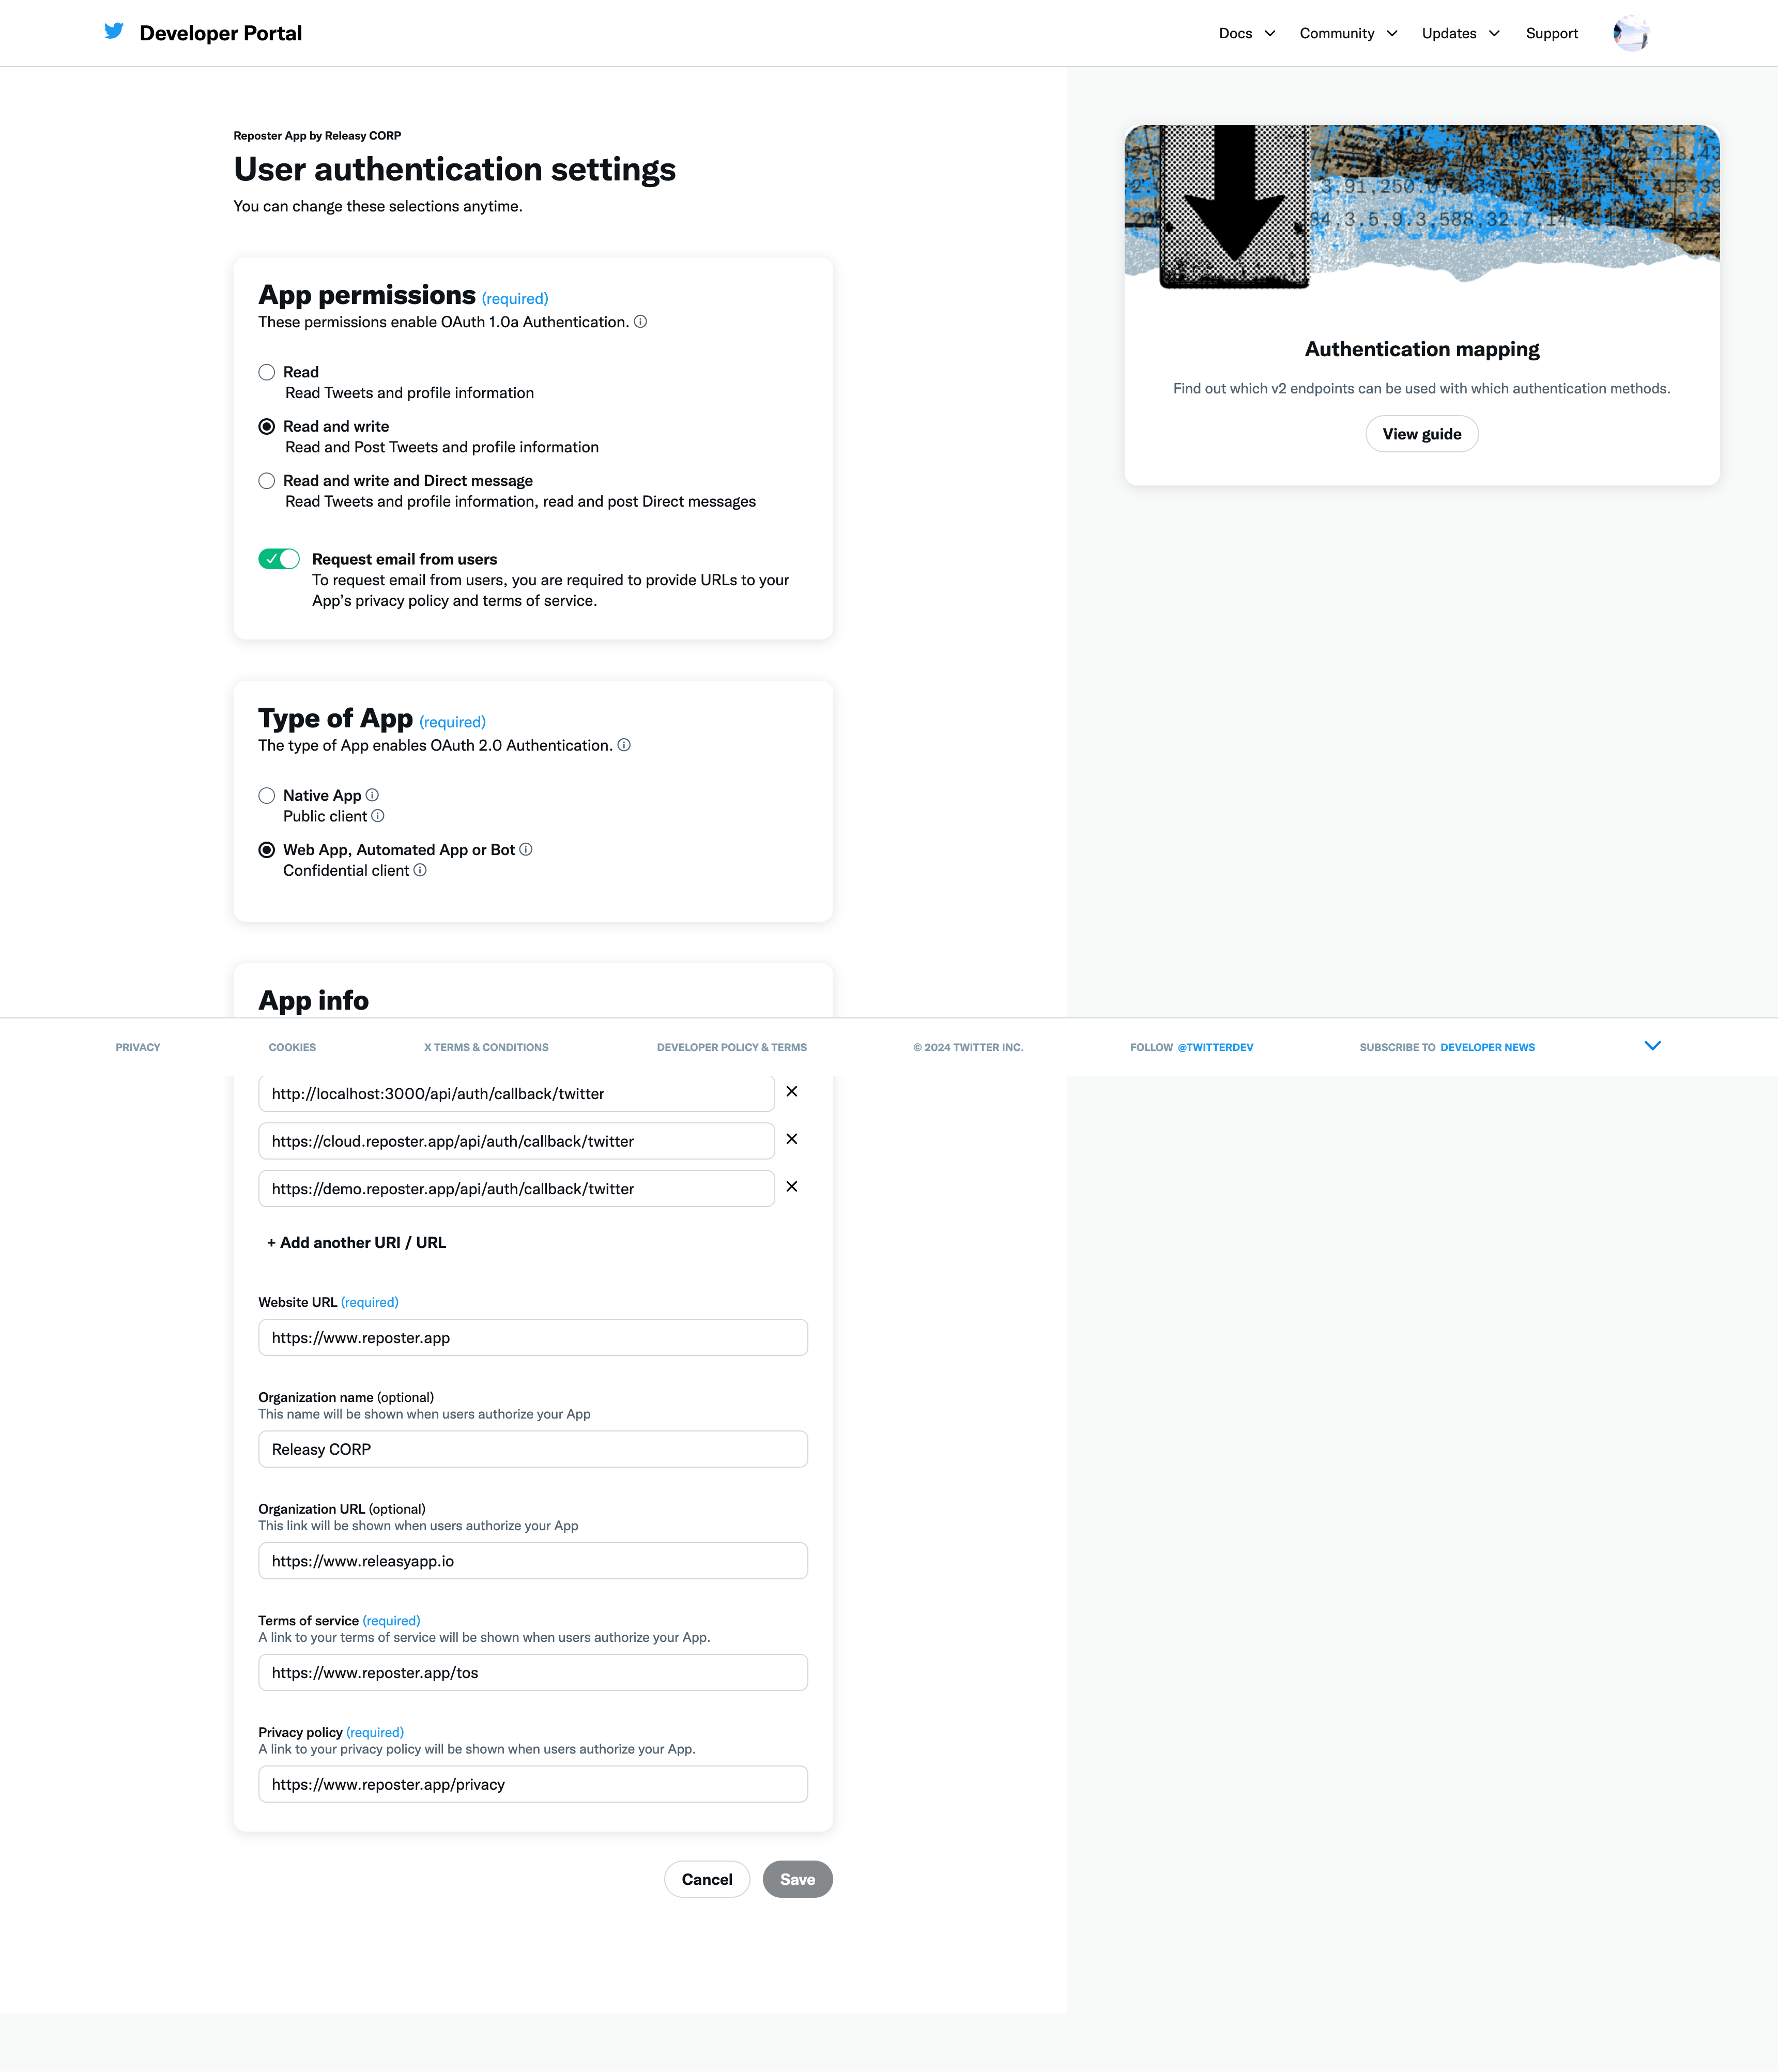
Once created the application, go to the "Settings" -> "User authentication settings" and edit the "User authentication set up":
- App permissions
- Read and write
- Type of App
- Web App, Automated App or Bot
- App info:
- Callback URI / Redirect URL:
- http://localhost:3000/api/auth/callback/twitter (for local development)
- https:///api/auth/callback/twitter (once deployed)
- Website URL
- add you main site url
- Terms of service
- add you main site tos
- Privacy policy
- add you main site privacy policy
- Callback URI / Redirect URL:
Once created the application, go to the "Keys and tokens" -> "OAuth 2.0 Client ID and Client Secret" section and get:
Client IDand fill theX_OAUTH2_CLIENT_IDvariable in the.envfileClient Secretand fill theX_OAUTH2_CLIENT_SECRETvariable in the.envfile
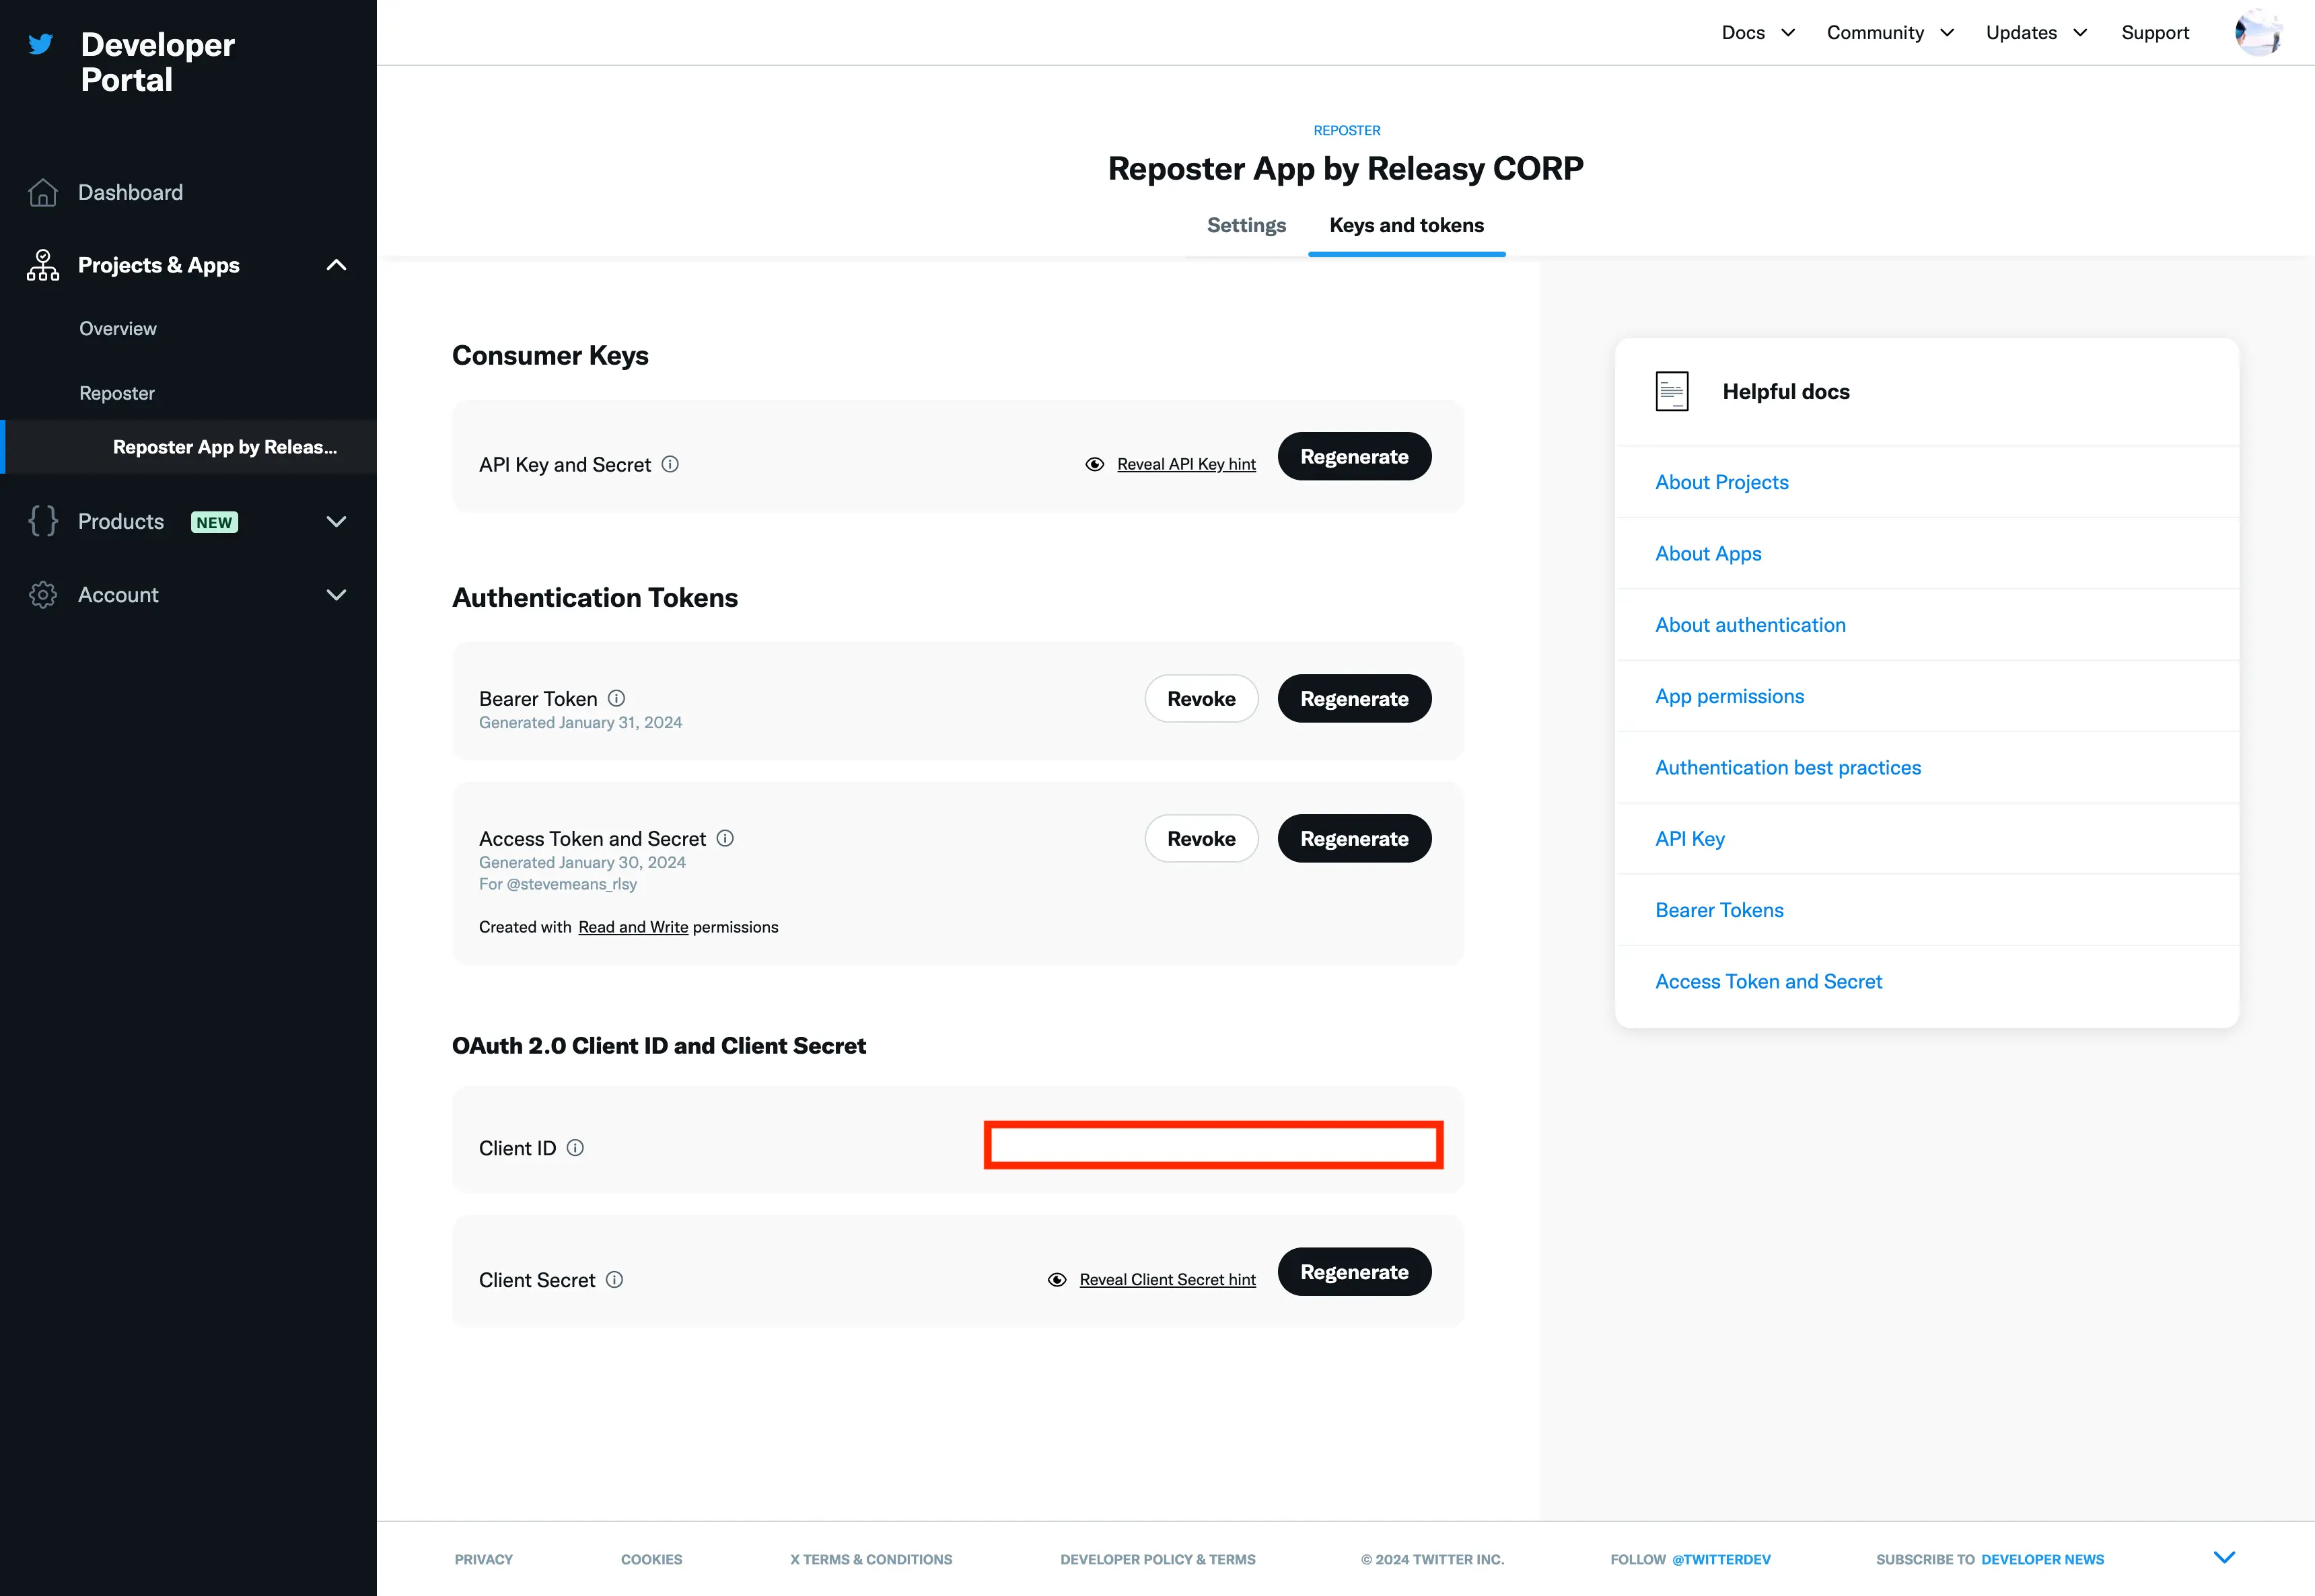
At this point you have setup all necessary configuration to publish textual only posts.
Add support for image upload (Optional)
To enable image upload, you need to get also some additional keys.
From the Developer Portal, open your application and go to the "Keys and tokens" section.
From "Consumer Keys" section and get:
Keyand fill theX_CONSUMER_KEYvariable in the.envfileSecretand fill theX_CONSUMER_SECRETvariable in the.envfile
From "Authentication Tokens" -> "Access Token and Secret" section and get:
Keyand fill theX_ACCESS_TOKENvariable in the.envfileSecretand fill theX_ACCESS_SECRETvariable in the.envfile
Setup S3 for image upload (Optional)
We are using the next-s3-upload package to directly upload all images from the next app to s3.
In order to do that, follow its detailed tutorial here
Create a new S3 bucket and store the name of the bucket as S3_UPLOAD_BUCKET and its region as S3_UPLOAD_REGION in your .env file.
Bucket permissions
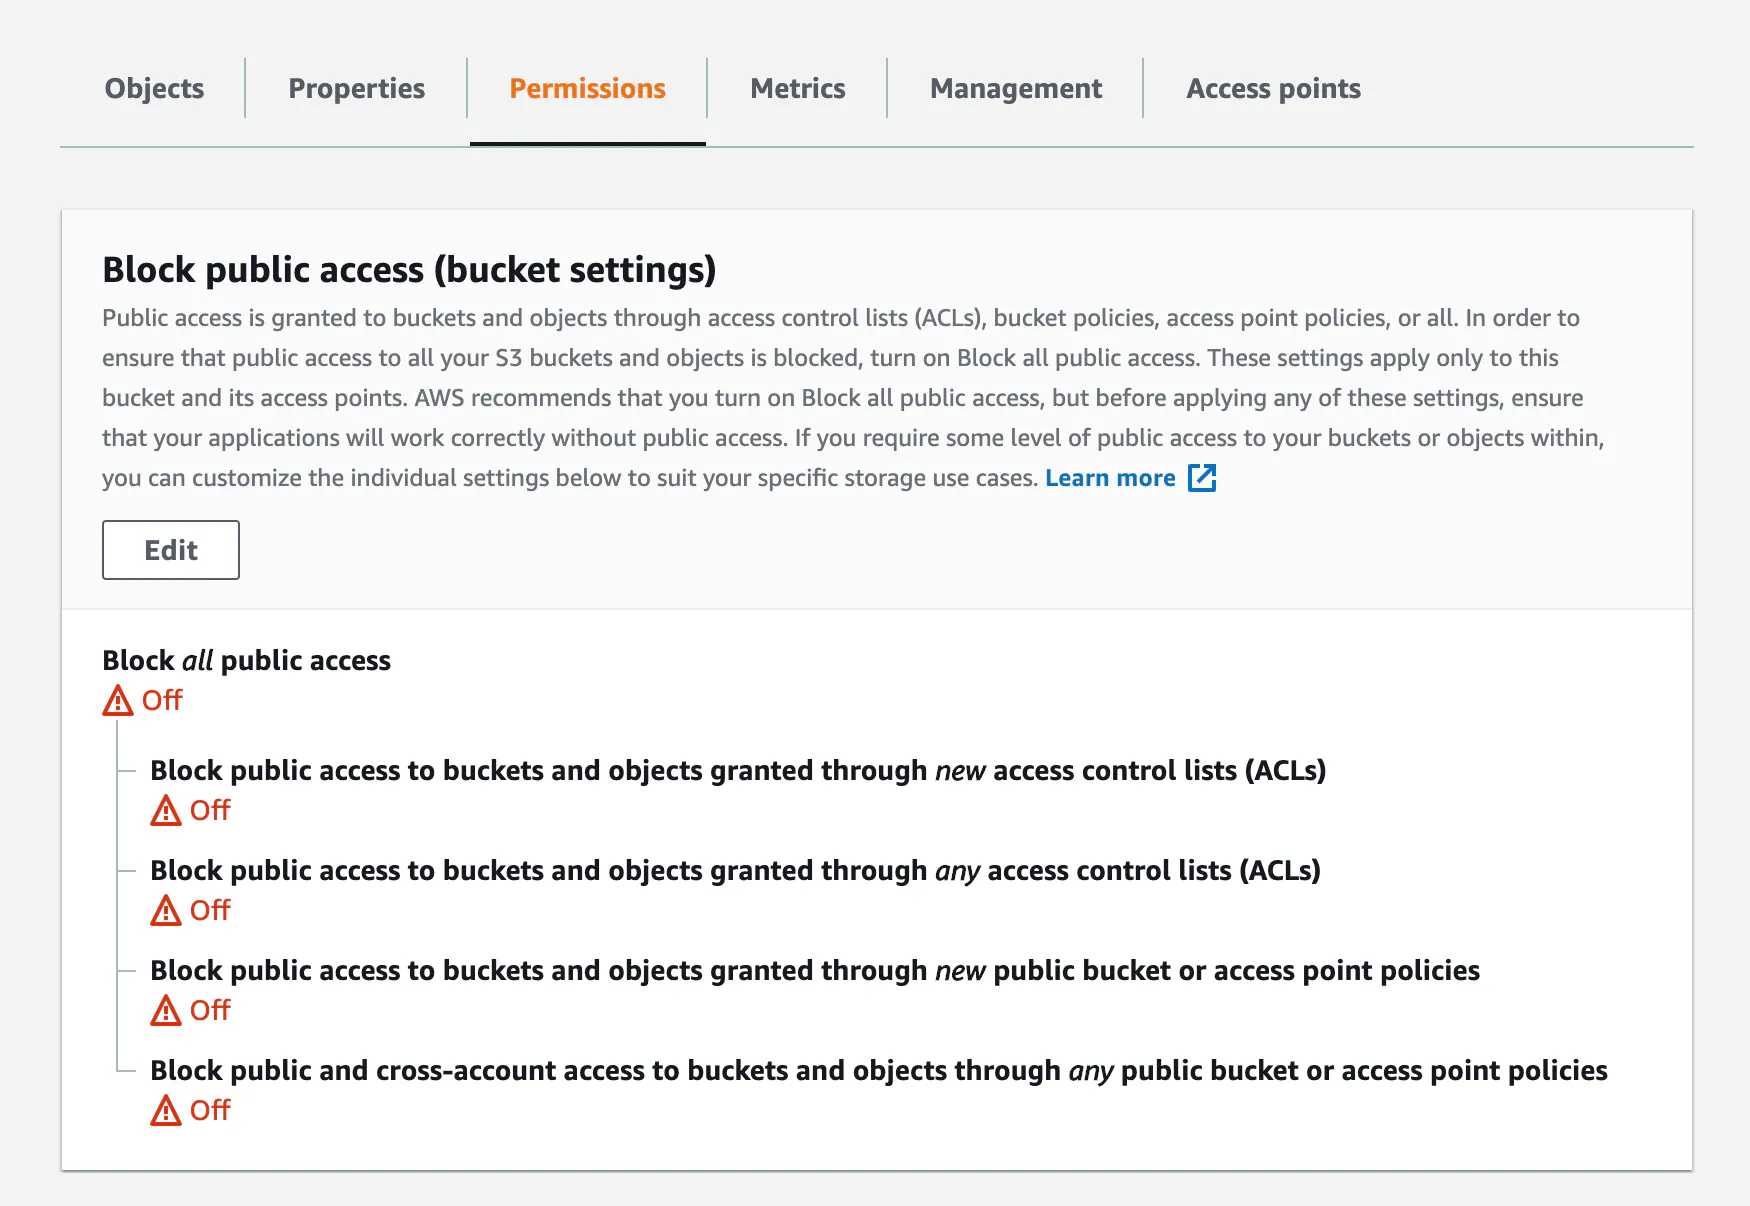
Public access
Once the bucket is created you'll need to go to the permissions tab and make sure that public access is not blocked.
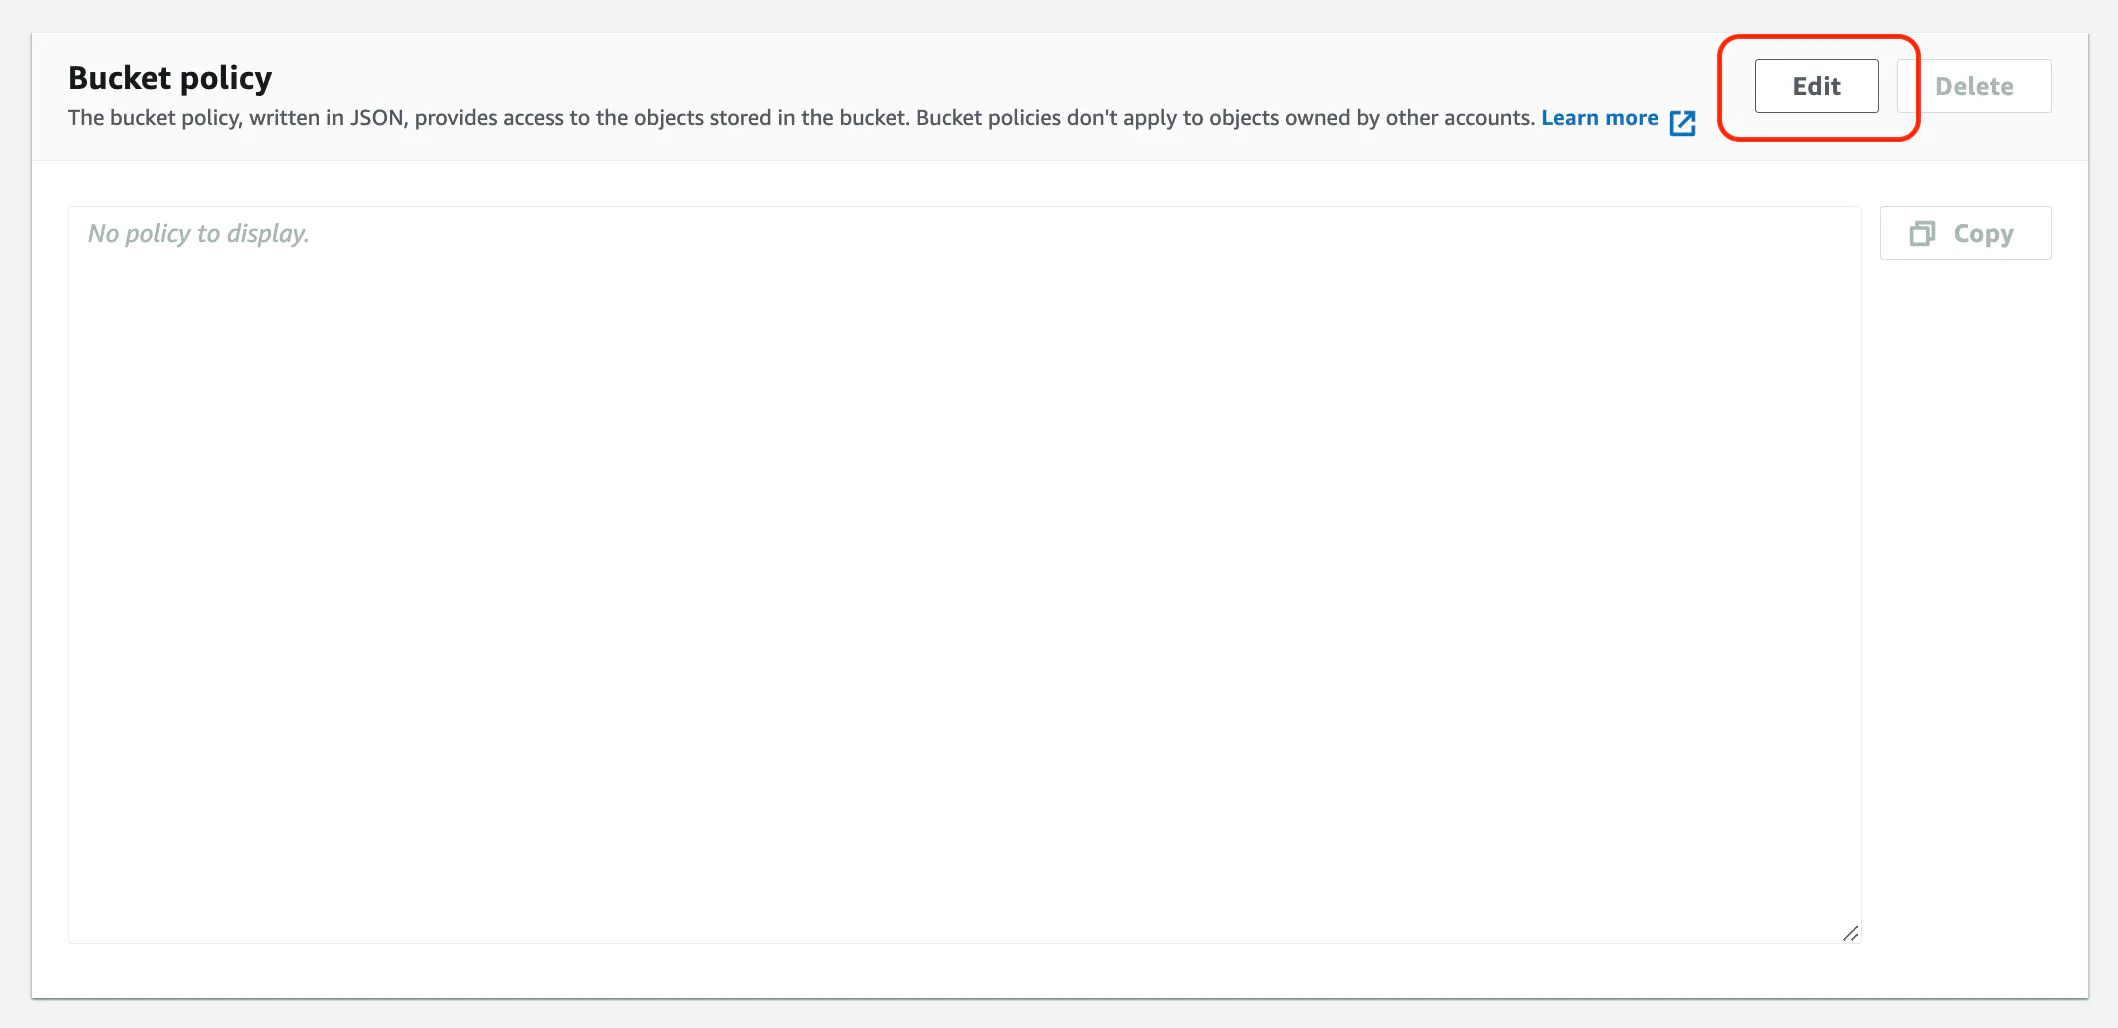
Bucket policy
Next, you'll need to add the following bucket policy. Click the Edit button in the Bucket policy section and paste in the following policy.
{
  "Version": "2012-10-17",
  "Statement": [
    {
      "Sid": "Statement1",
      "Effect": "Allow",
      "Principal": "*",
      "Action": "s3:GetObject",
      "Resource": "arn:aws:s3:::BUCKET_NAME/*"
    }
  ]
}
Before saving the policy, you'll need to replace BUCKET_NAME with the name of the bucket you created in the previous step.
Save the policy to return to the bucket permissions screen.
CORS permissions
Next, you'll also need to add the following permissions in the CORS section.
[
  {
    "AllowedHeaders": ["*"],
    "AllowedMethods": ["PUT", "POST"],
    "AllowedOrigins": ["*"],
    "ExposeHeaders": ["ETag"]
  }
]
Here's what the CORS permissions will look like once you paste in the above JSON.
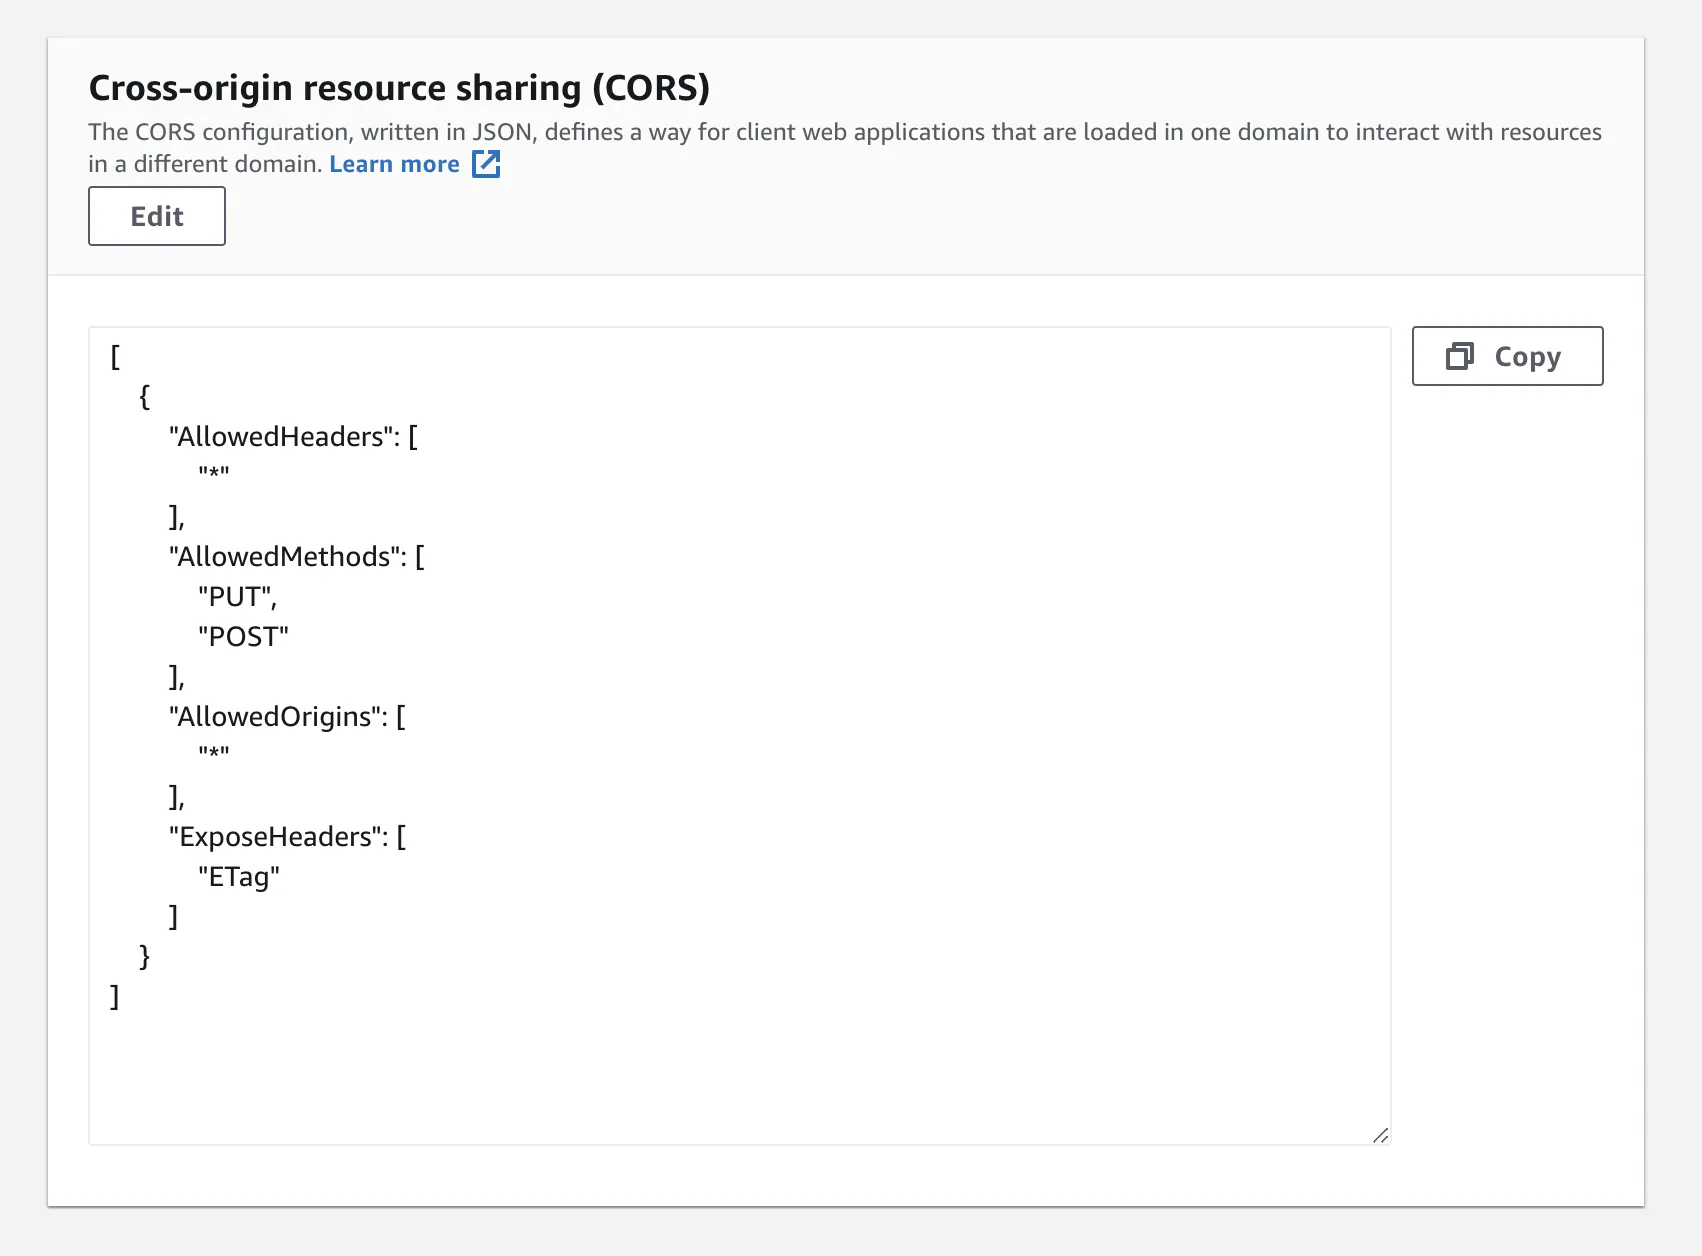
These settings are required so users can upload files to your bucket.
IAM user
Next, we'll need to create API keys that give your Next app access to AWS.
Go to the IAM section of AWS and add a new user with Programmatic access.
For the permissions step click Attach existing policies directly and then click the Create policy button.
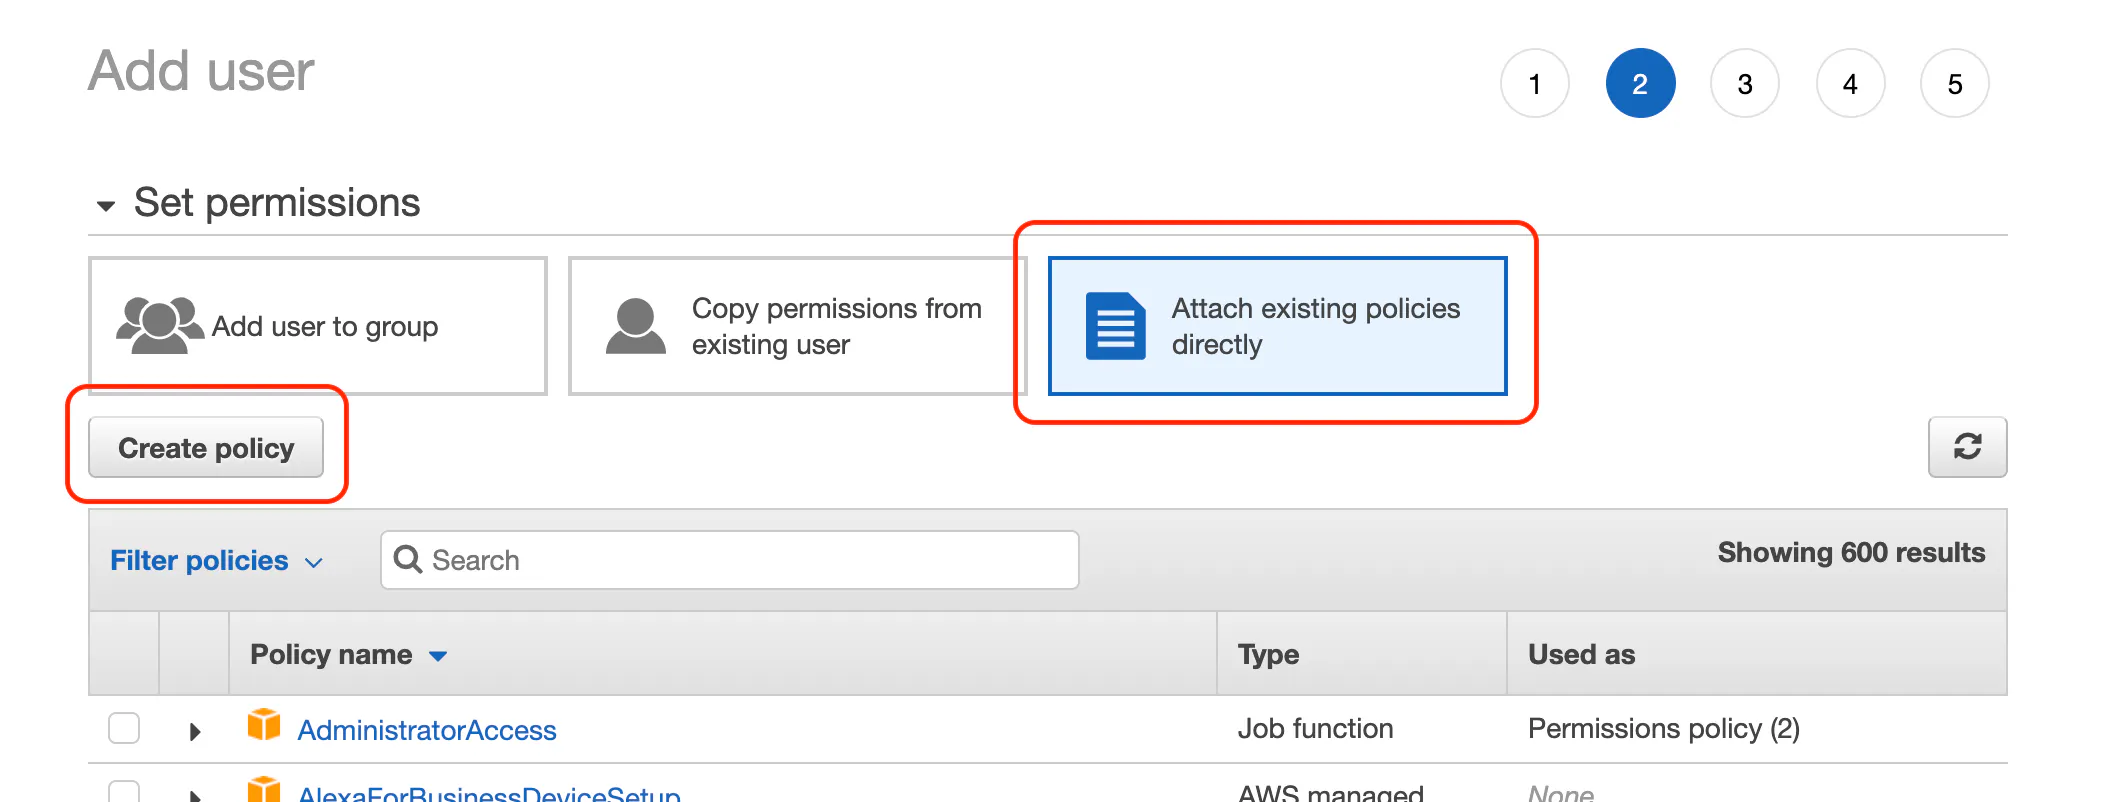
When the policy editor opens, click on the JSON tab and paste in the following policy.
{
  "Version": "2012-10-17",
  "Statement": [
    {
      "Sid": "STSToken",
      "Effect": "Allow",
      "Action": "sts:GetFederationToken",
      "Resource": ["arn:aws:sts::ACCOUNT_ID:federated-user/S3UploadWebToken"]
    },
    {
      "Sid": "S3UploadAssets",
      "Effect": "Allow",
      "Action": "s3:*",
      "Resource": [
        "arn:aws:s3:::BUCKET_NAME",
        "arn:aws:s3:::BUCKET_NAME/*.jpg",
        "arn:aws:s3:::BUCKET_NAME/*.jpeg",
        "arn:aws:s3:::BUCKET_NAME/*.png",
        "arn:aws:s3:::BUCKET_NAME/*.gif",
        "arn:aws:s3:::BUCKET_NAME/*.webp"
      ]
    }
  ]
}
Before saving the policy, you'll need to replace:
ACCOUNT_IDYour AWS account ID. You can get this number by clicking on your name in the header. It's the number next to My account.BUCKET_NAMEThe name of the bucket you created in the previous step.
Allowed file formats
The example above only allows jpg, jpeg, png, gif and webp files to be uploaded: you'll want to make sure that only images are allowed to be uploaded.
Save the policy
Next, click review policy, and name the policy next-s3-upload. The name doesn't matter, so feel free to use anything you'd like. Follow any prompts and create the policy.
Now go back to the tab where you were adding a user. Search for the policy you created and select it. If the policy doesn't show up click the refresh button.

Select the policy and continue creating the user. You can just click through the next steps, there's no more configuration.
Once the user is created you'll see a screen with their API keys. Copy these keys to .env as S3_UPLOAD_KEY and S3_UPLOAD_SECRET.

That's it! We're done configuring AWS for uploads.
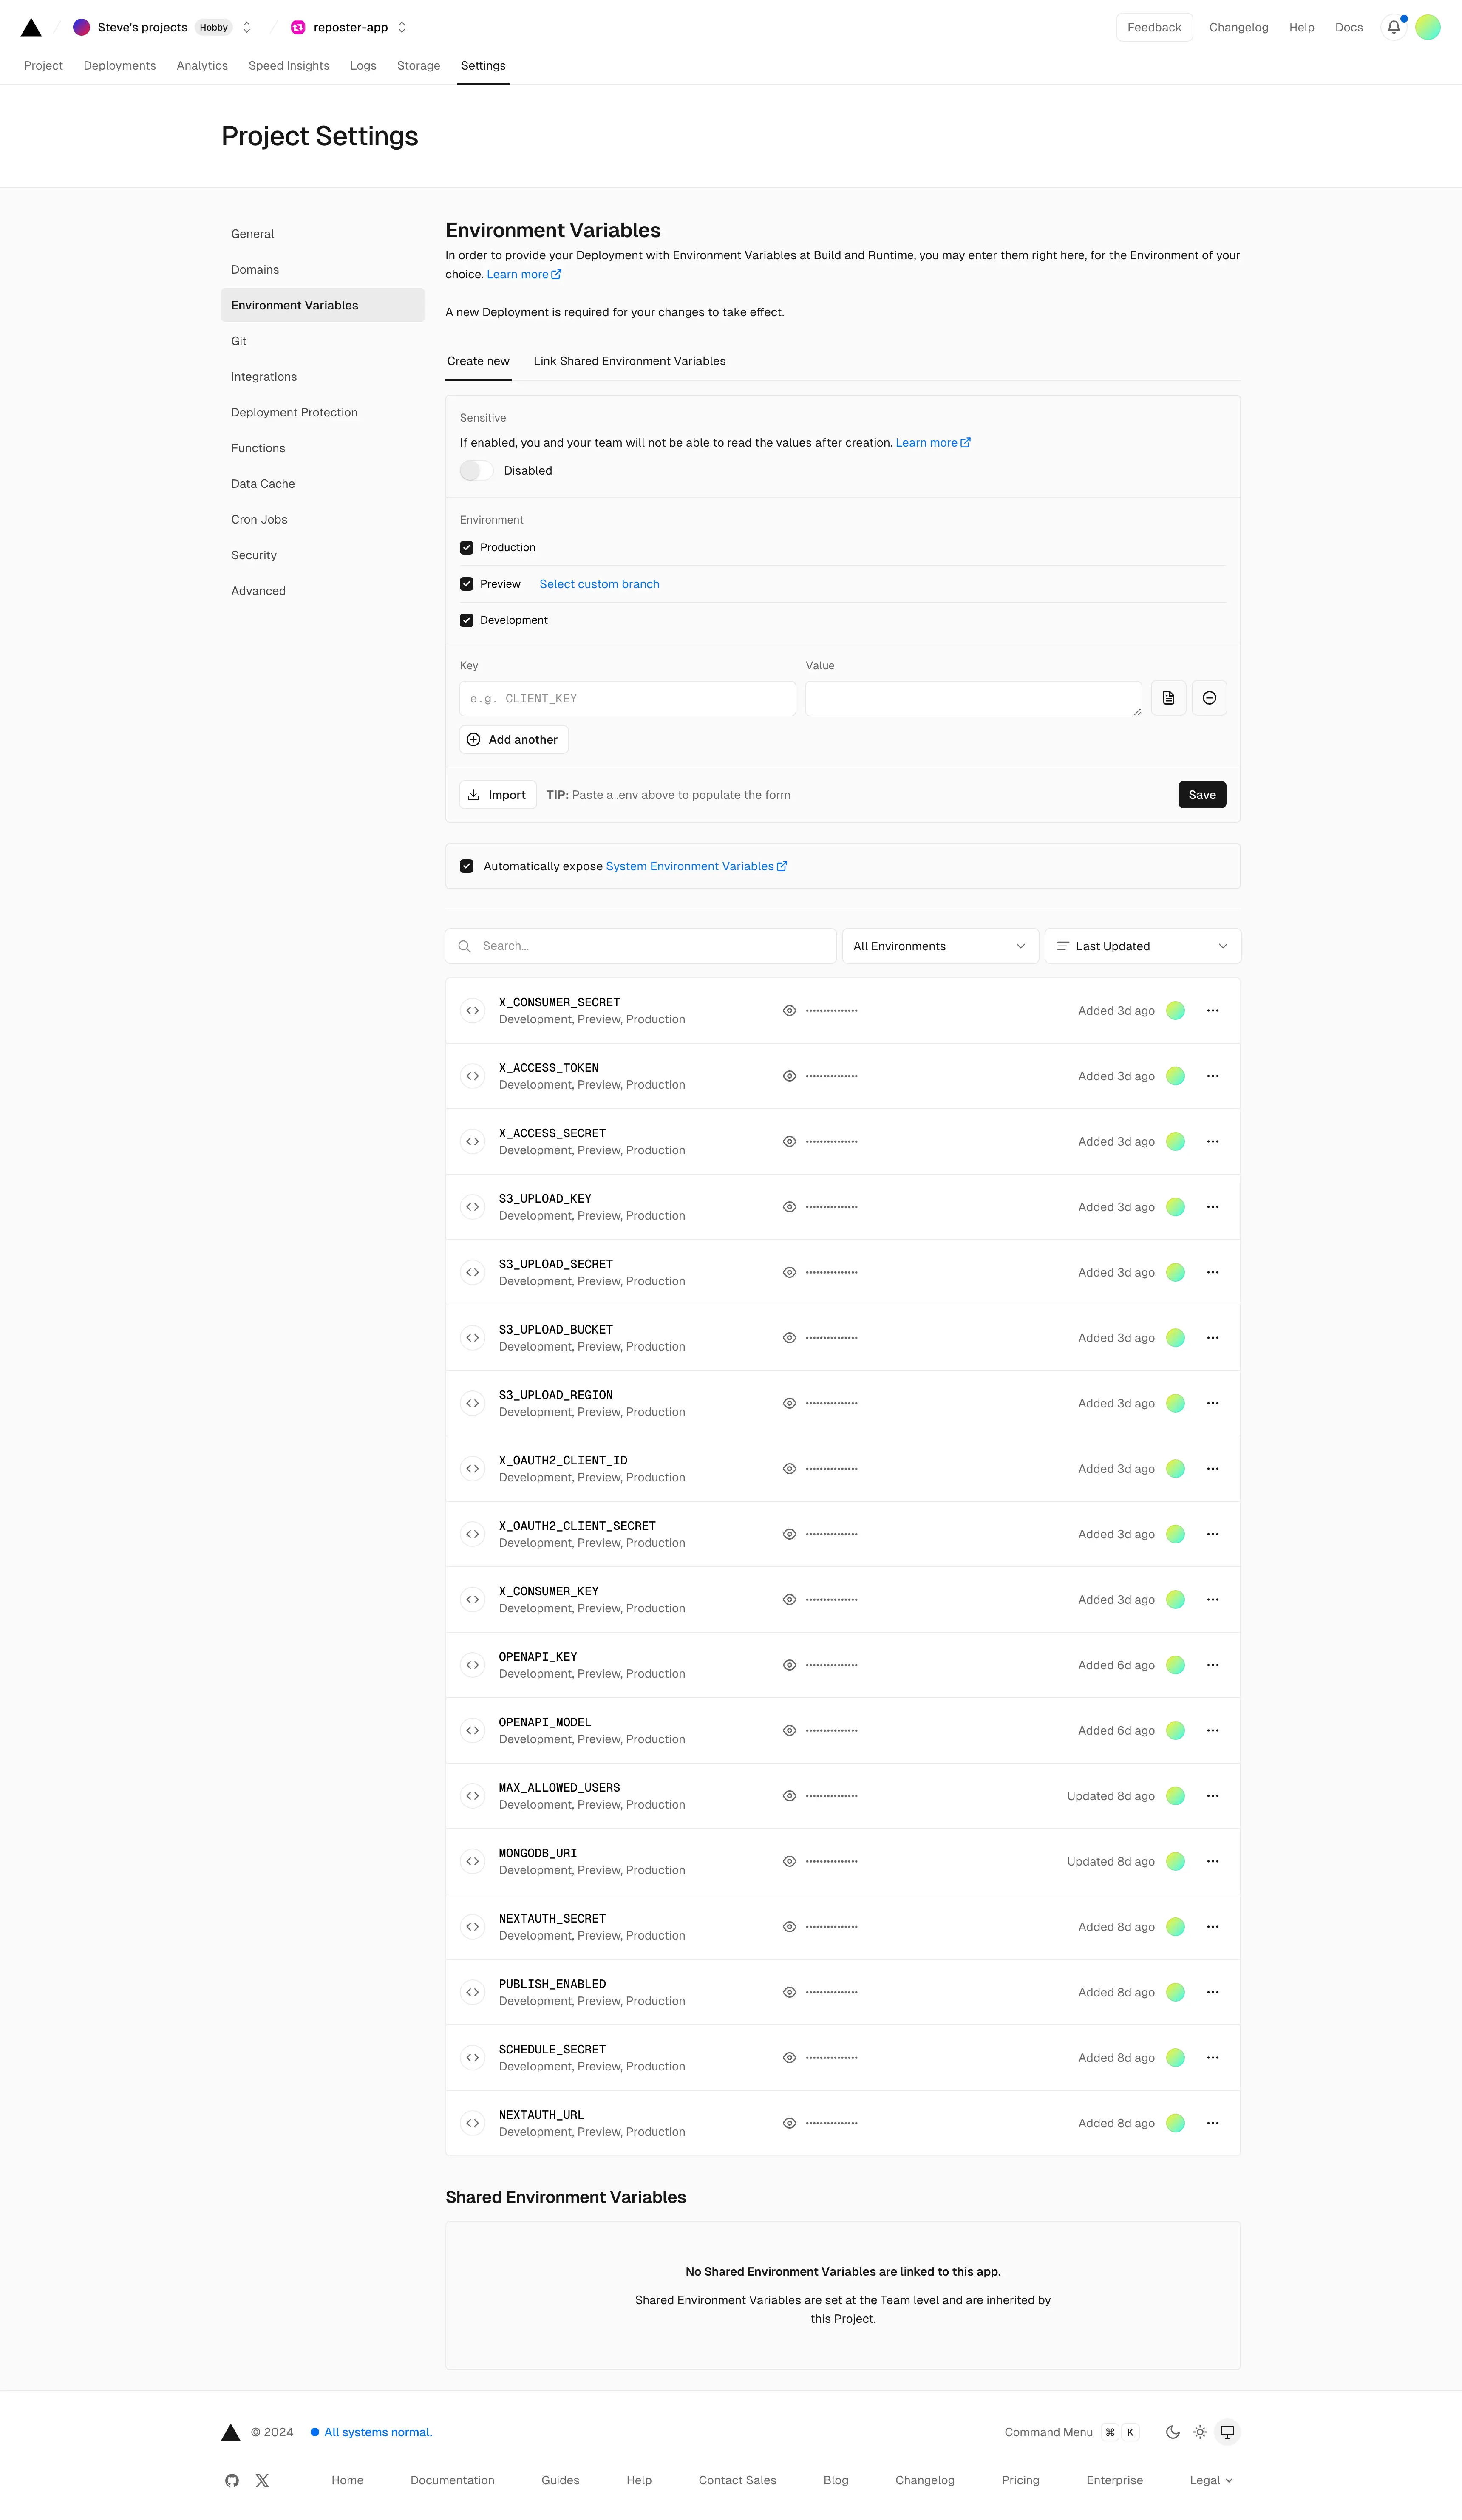
After completing the Setup section, you should have filled all these variables in the .env file:
S3_UPLOAD_KEY=S3_UPLOAD_SECRET=S3_UPLOAD_BUCKET=name-of-s3-bucketS3_UPLOAD_REGION=us-east-1
Add support for OpenAI (Optional)
Create an account on the OpenAI Platform.
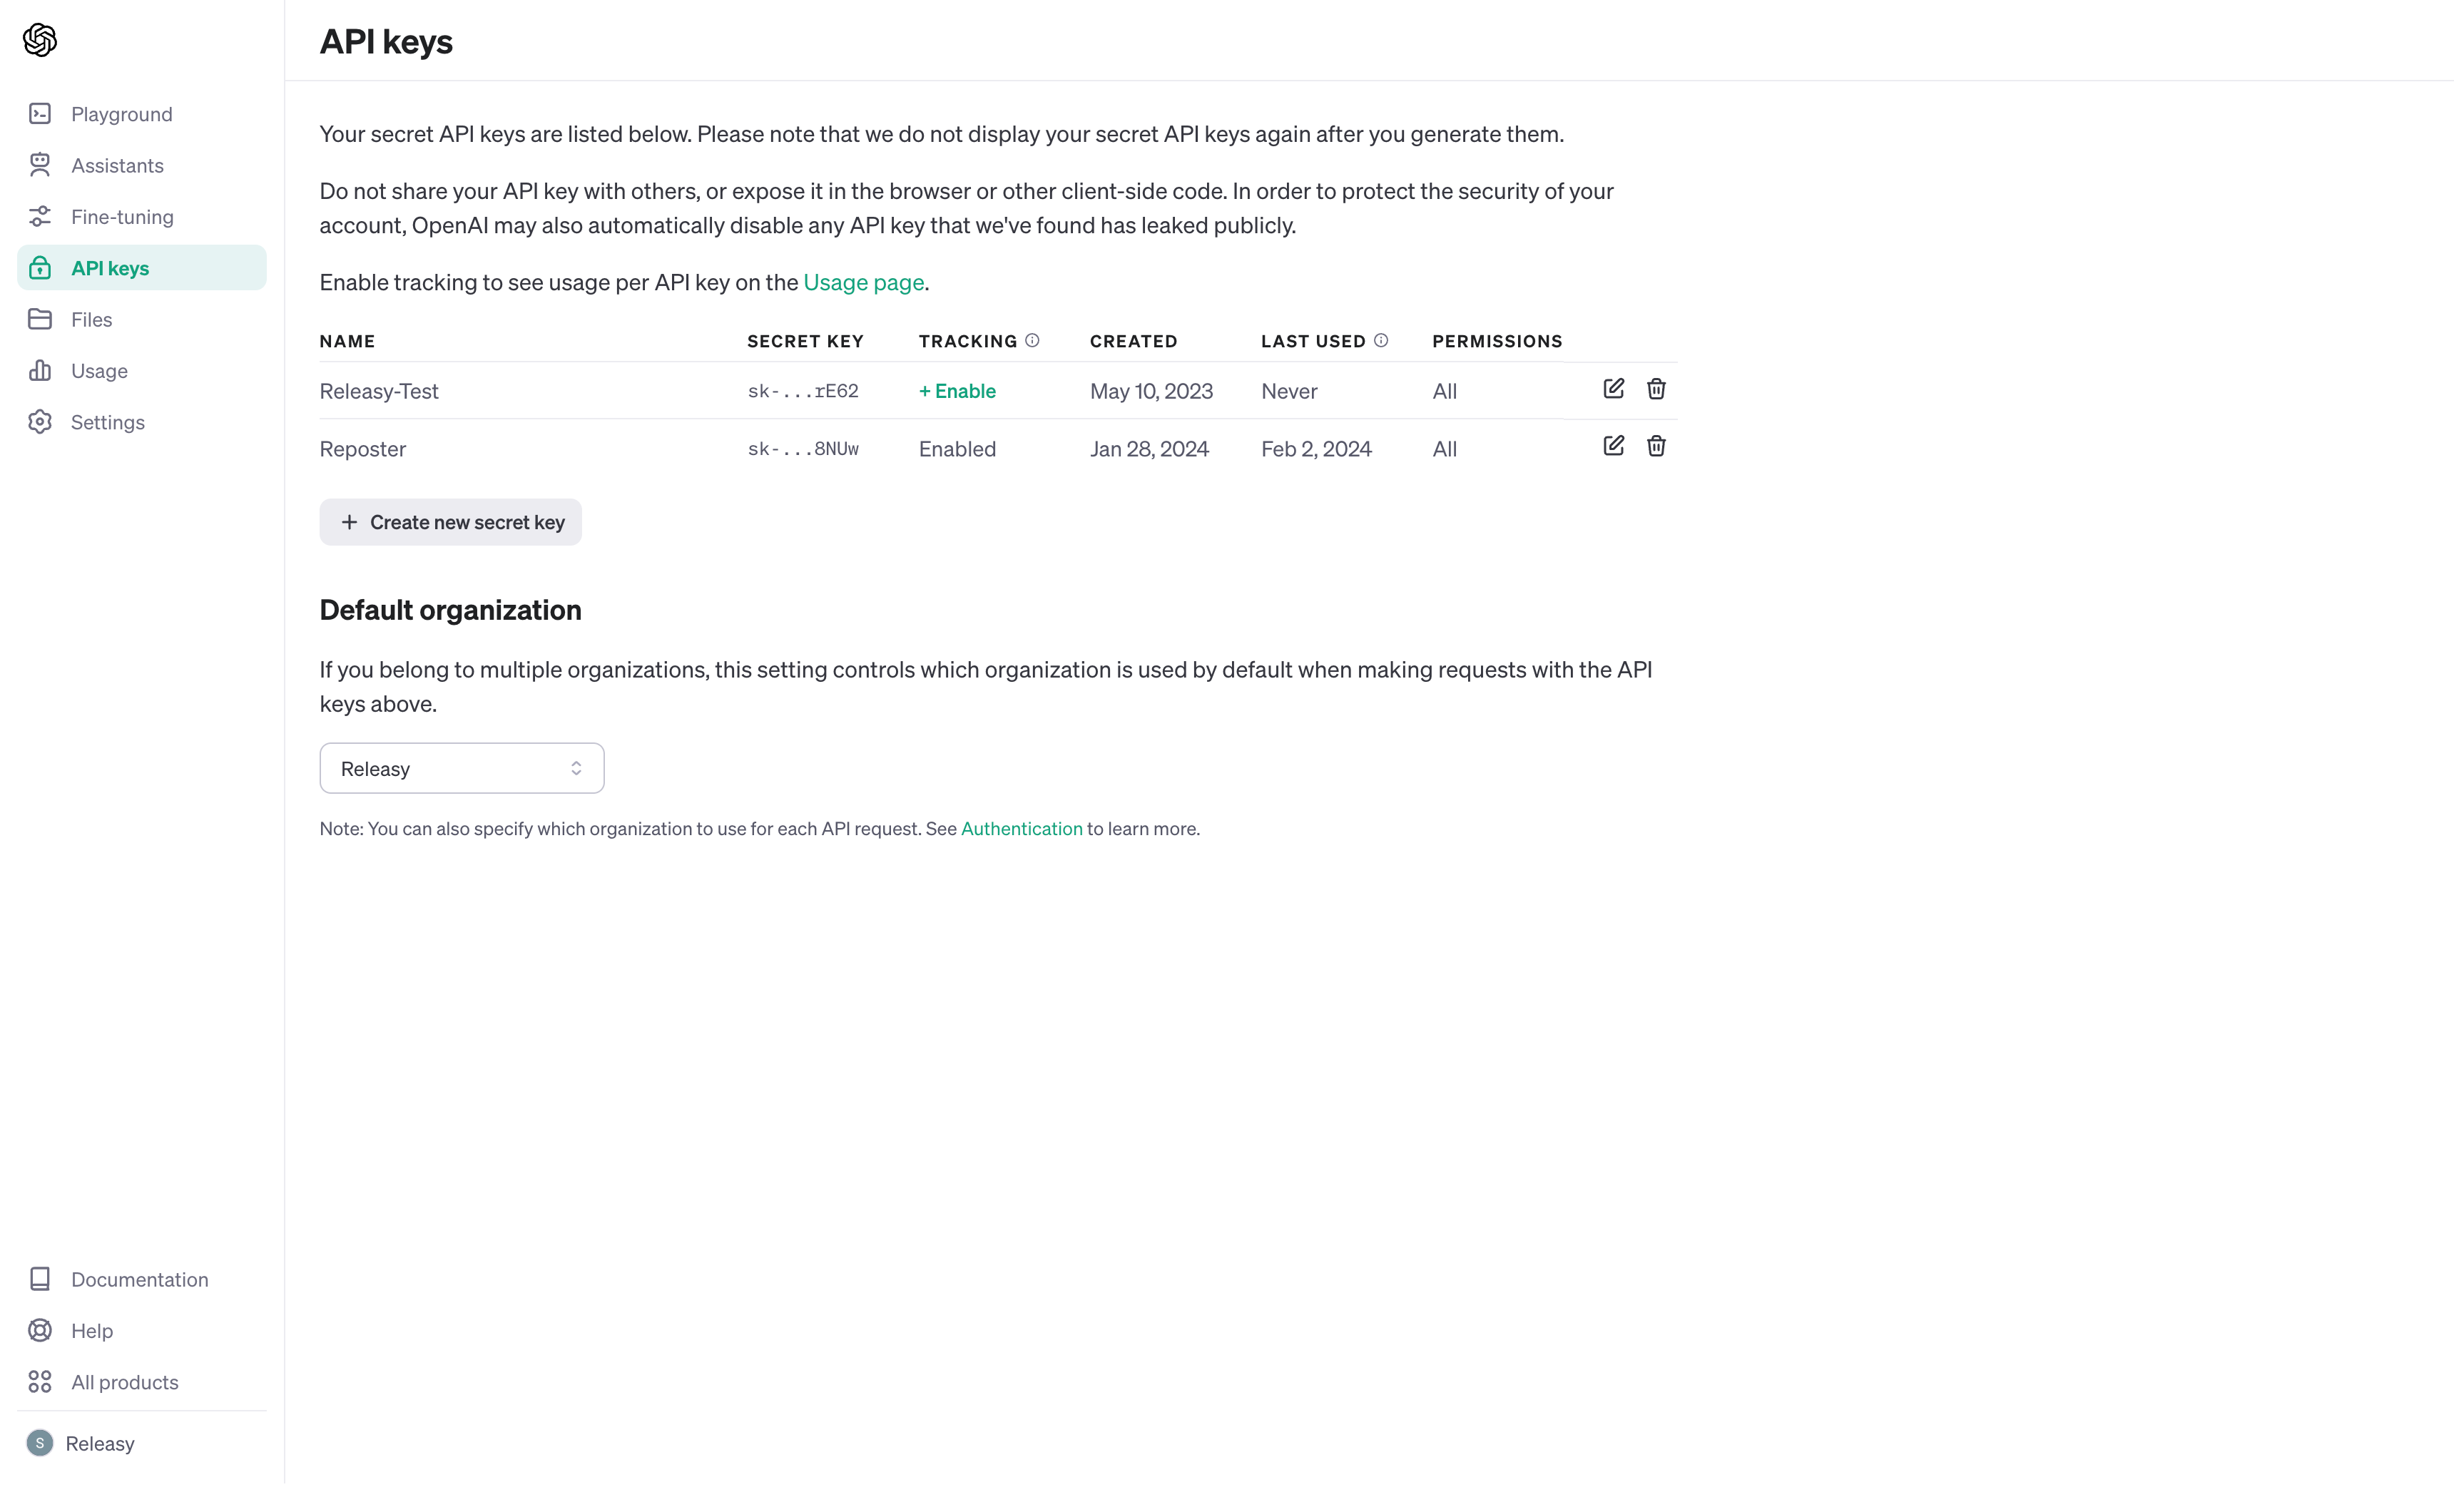
Once you have funded you account, grab the key from https://platform.openai.com/api-keys and paste it into the OPENAPI_KEY variable in the .env file.
Additional config variables
If you want to enable the signup to more than one user, just change the value of MAX_ALLOWED_USERS=1 in the .env file
If you don't want to publish on X, just set as false the variable PUBLISH_ENABLED=true
The SCHEDULE_SECRET variable is used to check that the CRON job call is authenticated. Change this value and keep it secret.
Deploy on Vercel
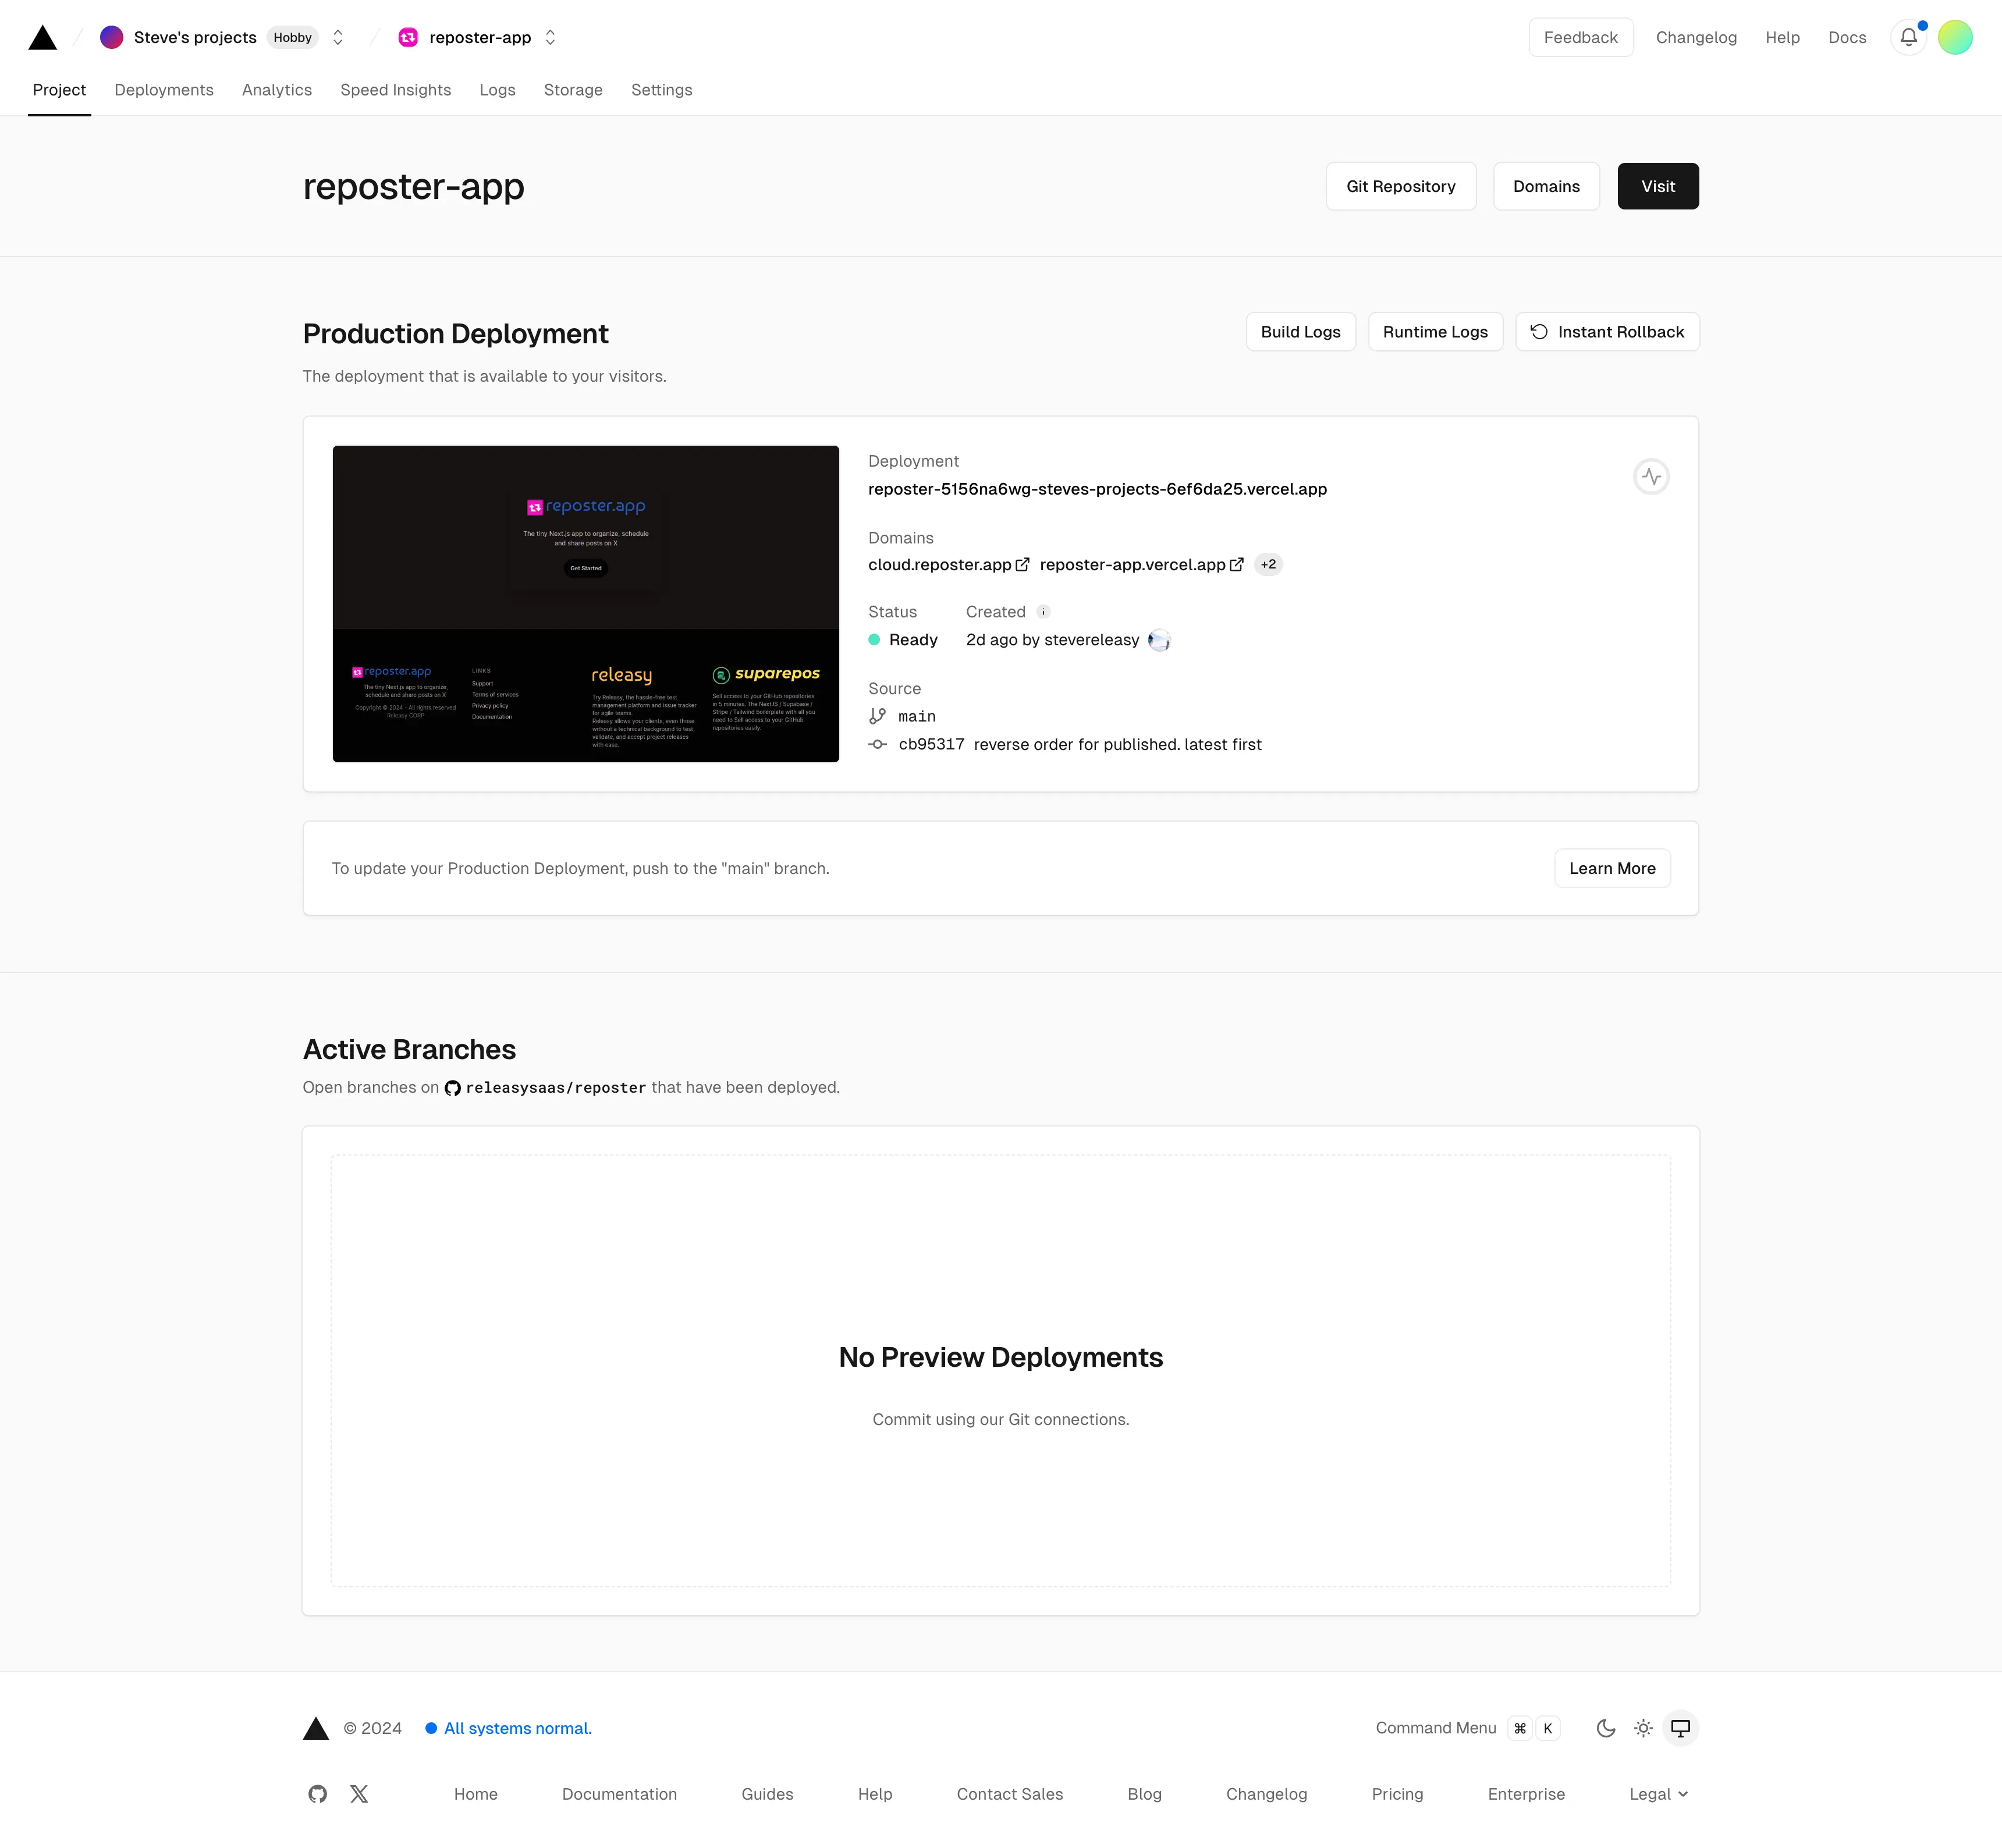
The easiest way to deploy your Next.js app is to use the Vercel Platform from the creators of Next.js.
Check out our Next.js deployment documentation for more details.
Create a CRON job
Reposter.app needs an external CRON job that call the <application-url>/api/webhook/scheduler endpoint to send posts to X.
The easiest way to create it is by creating an account on Cron Jobs.
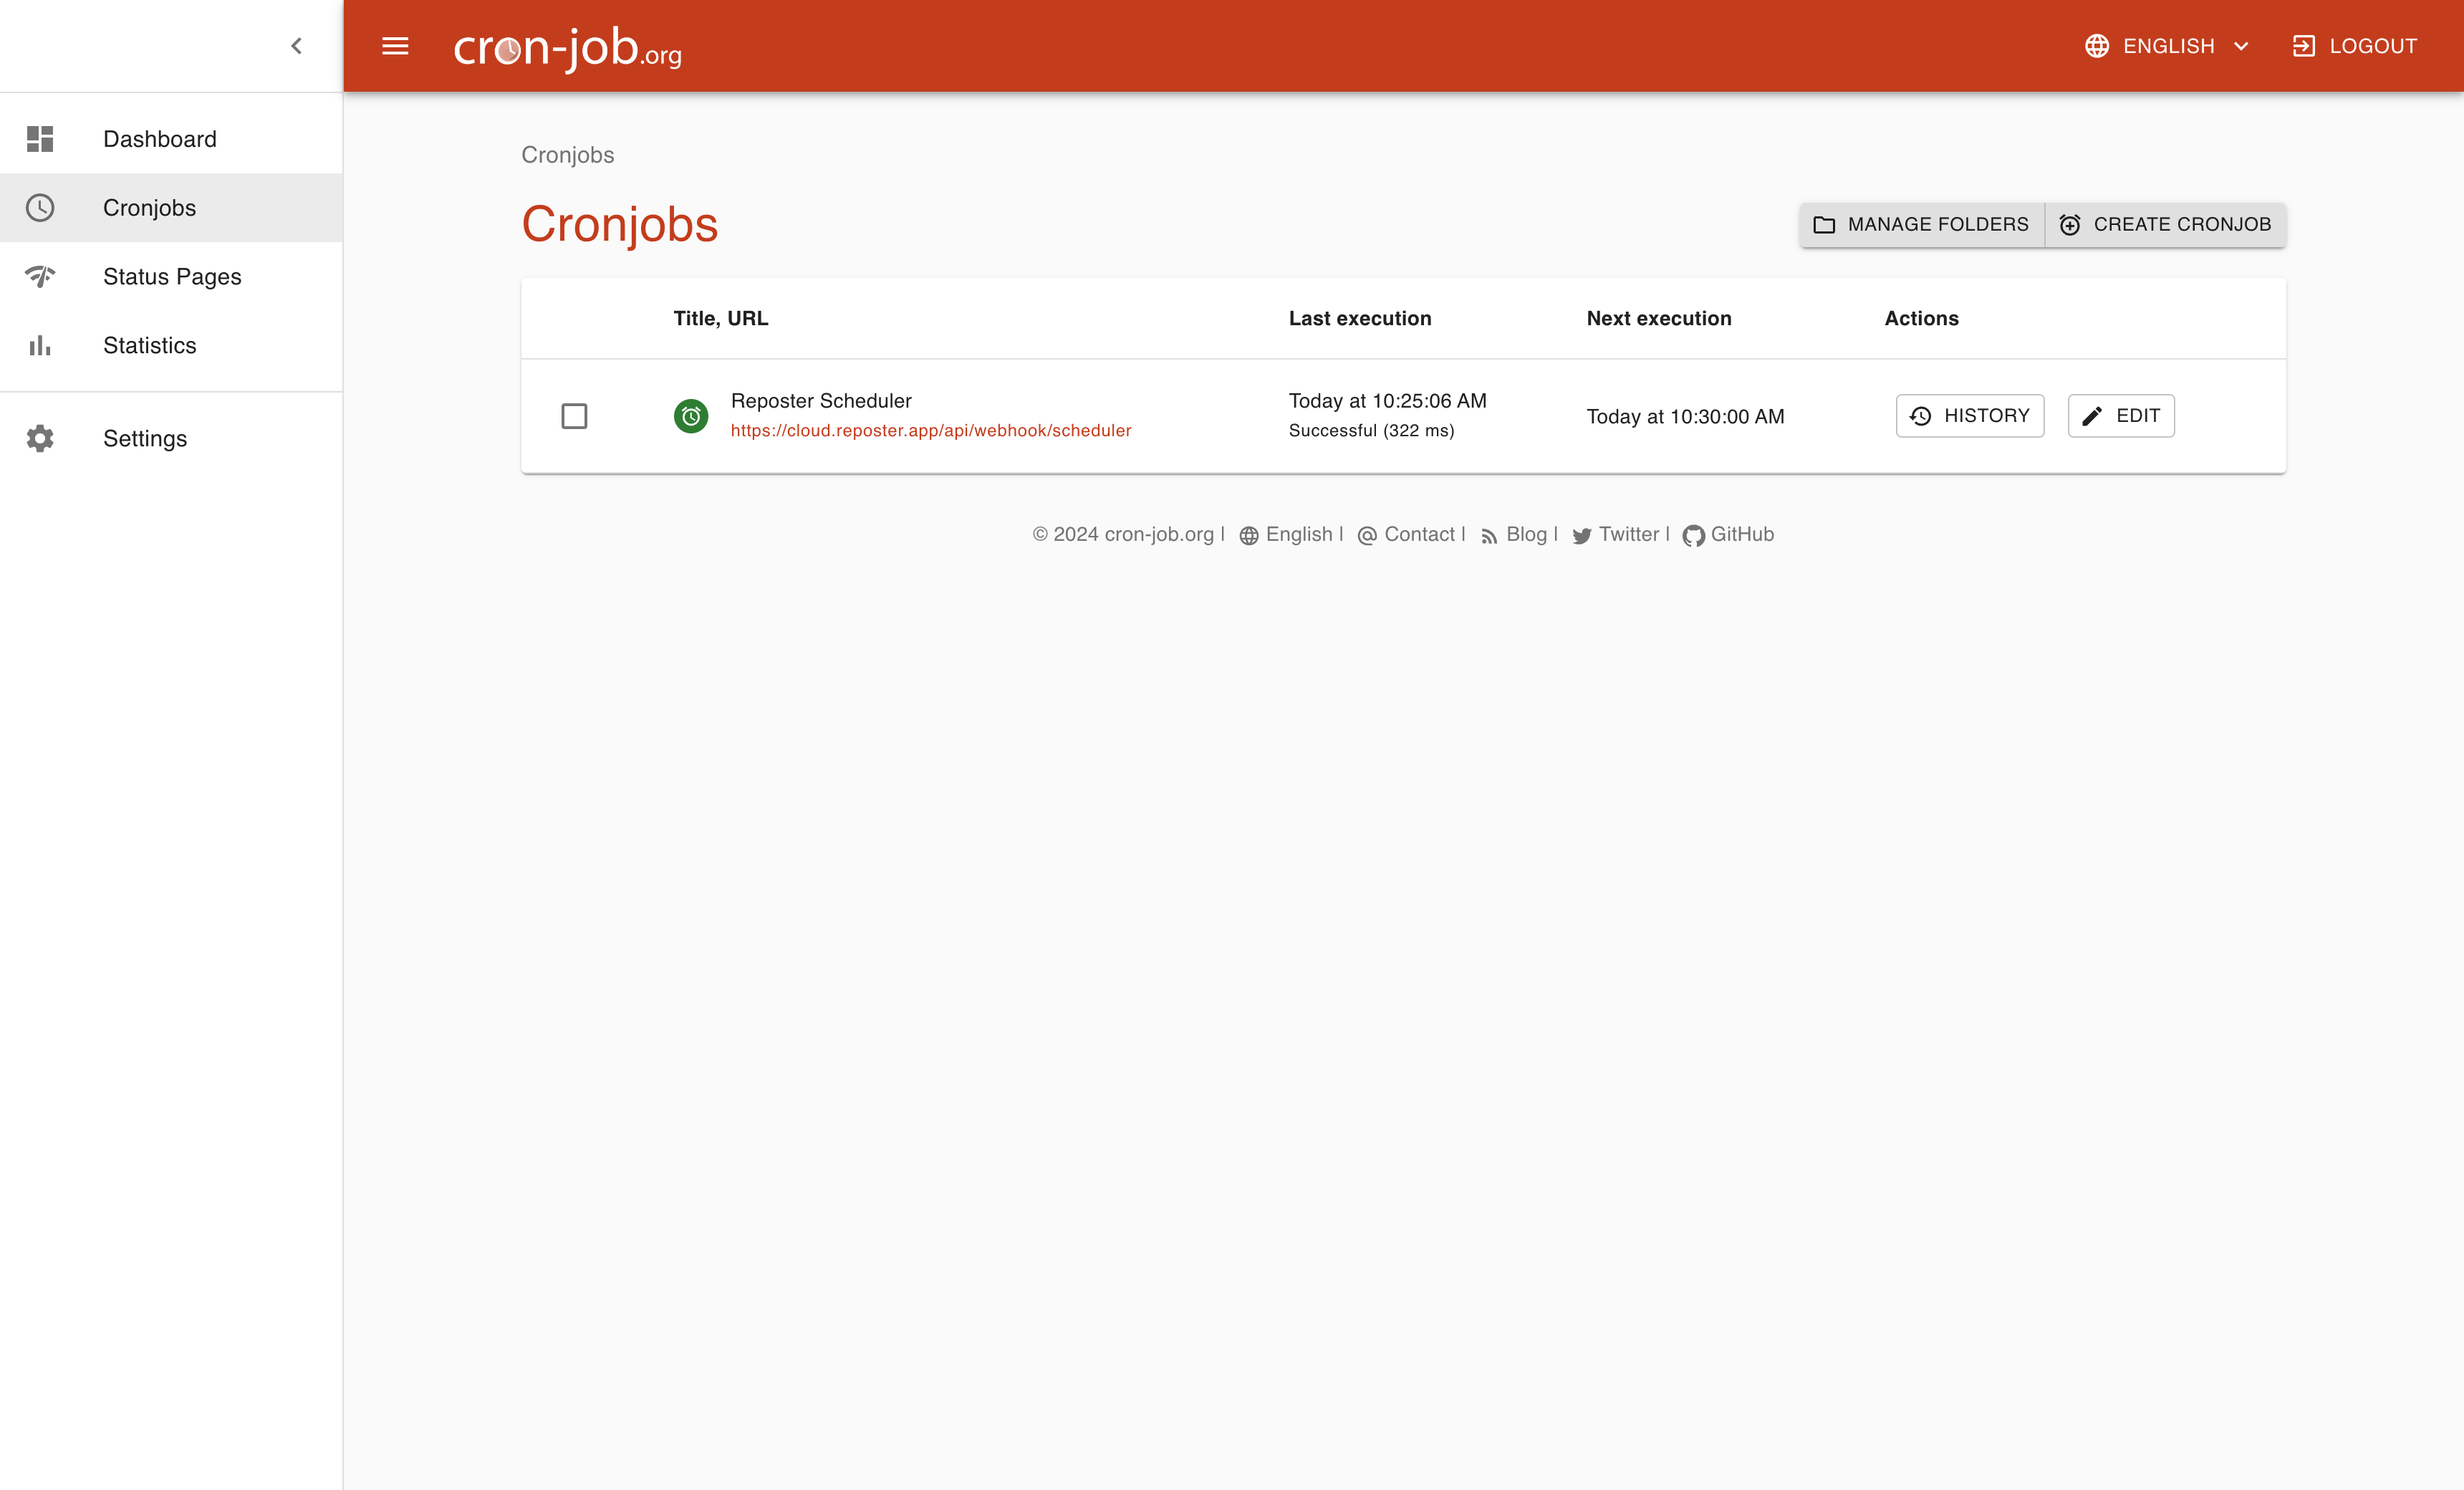
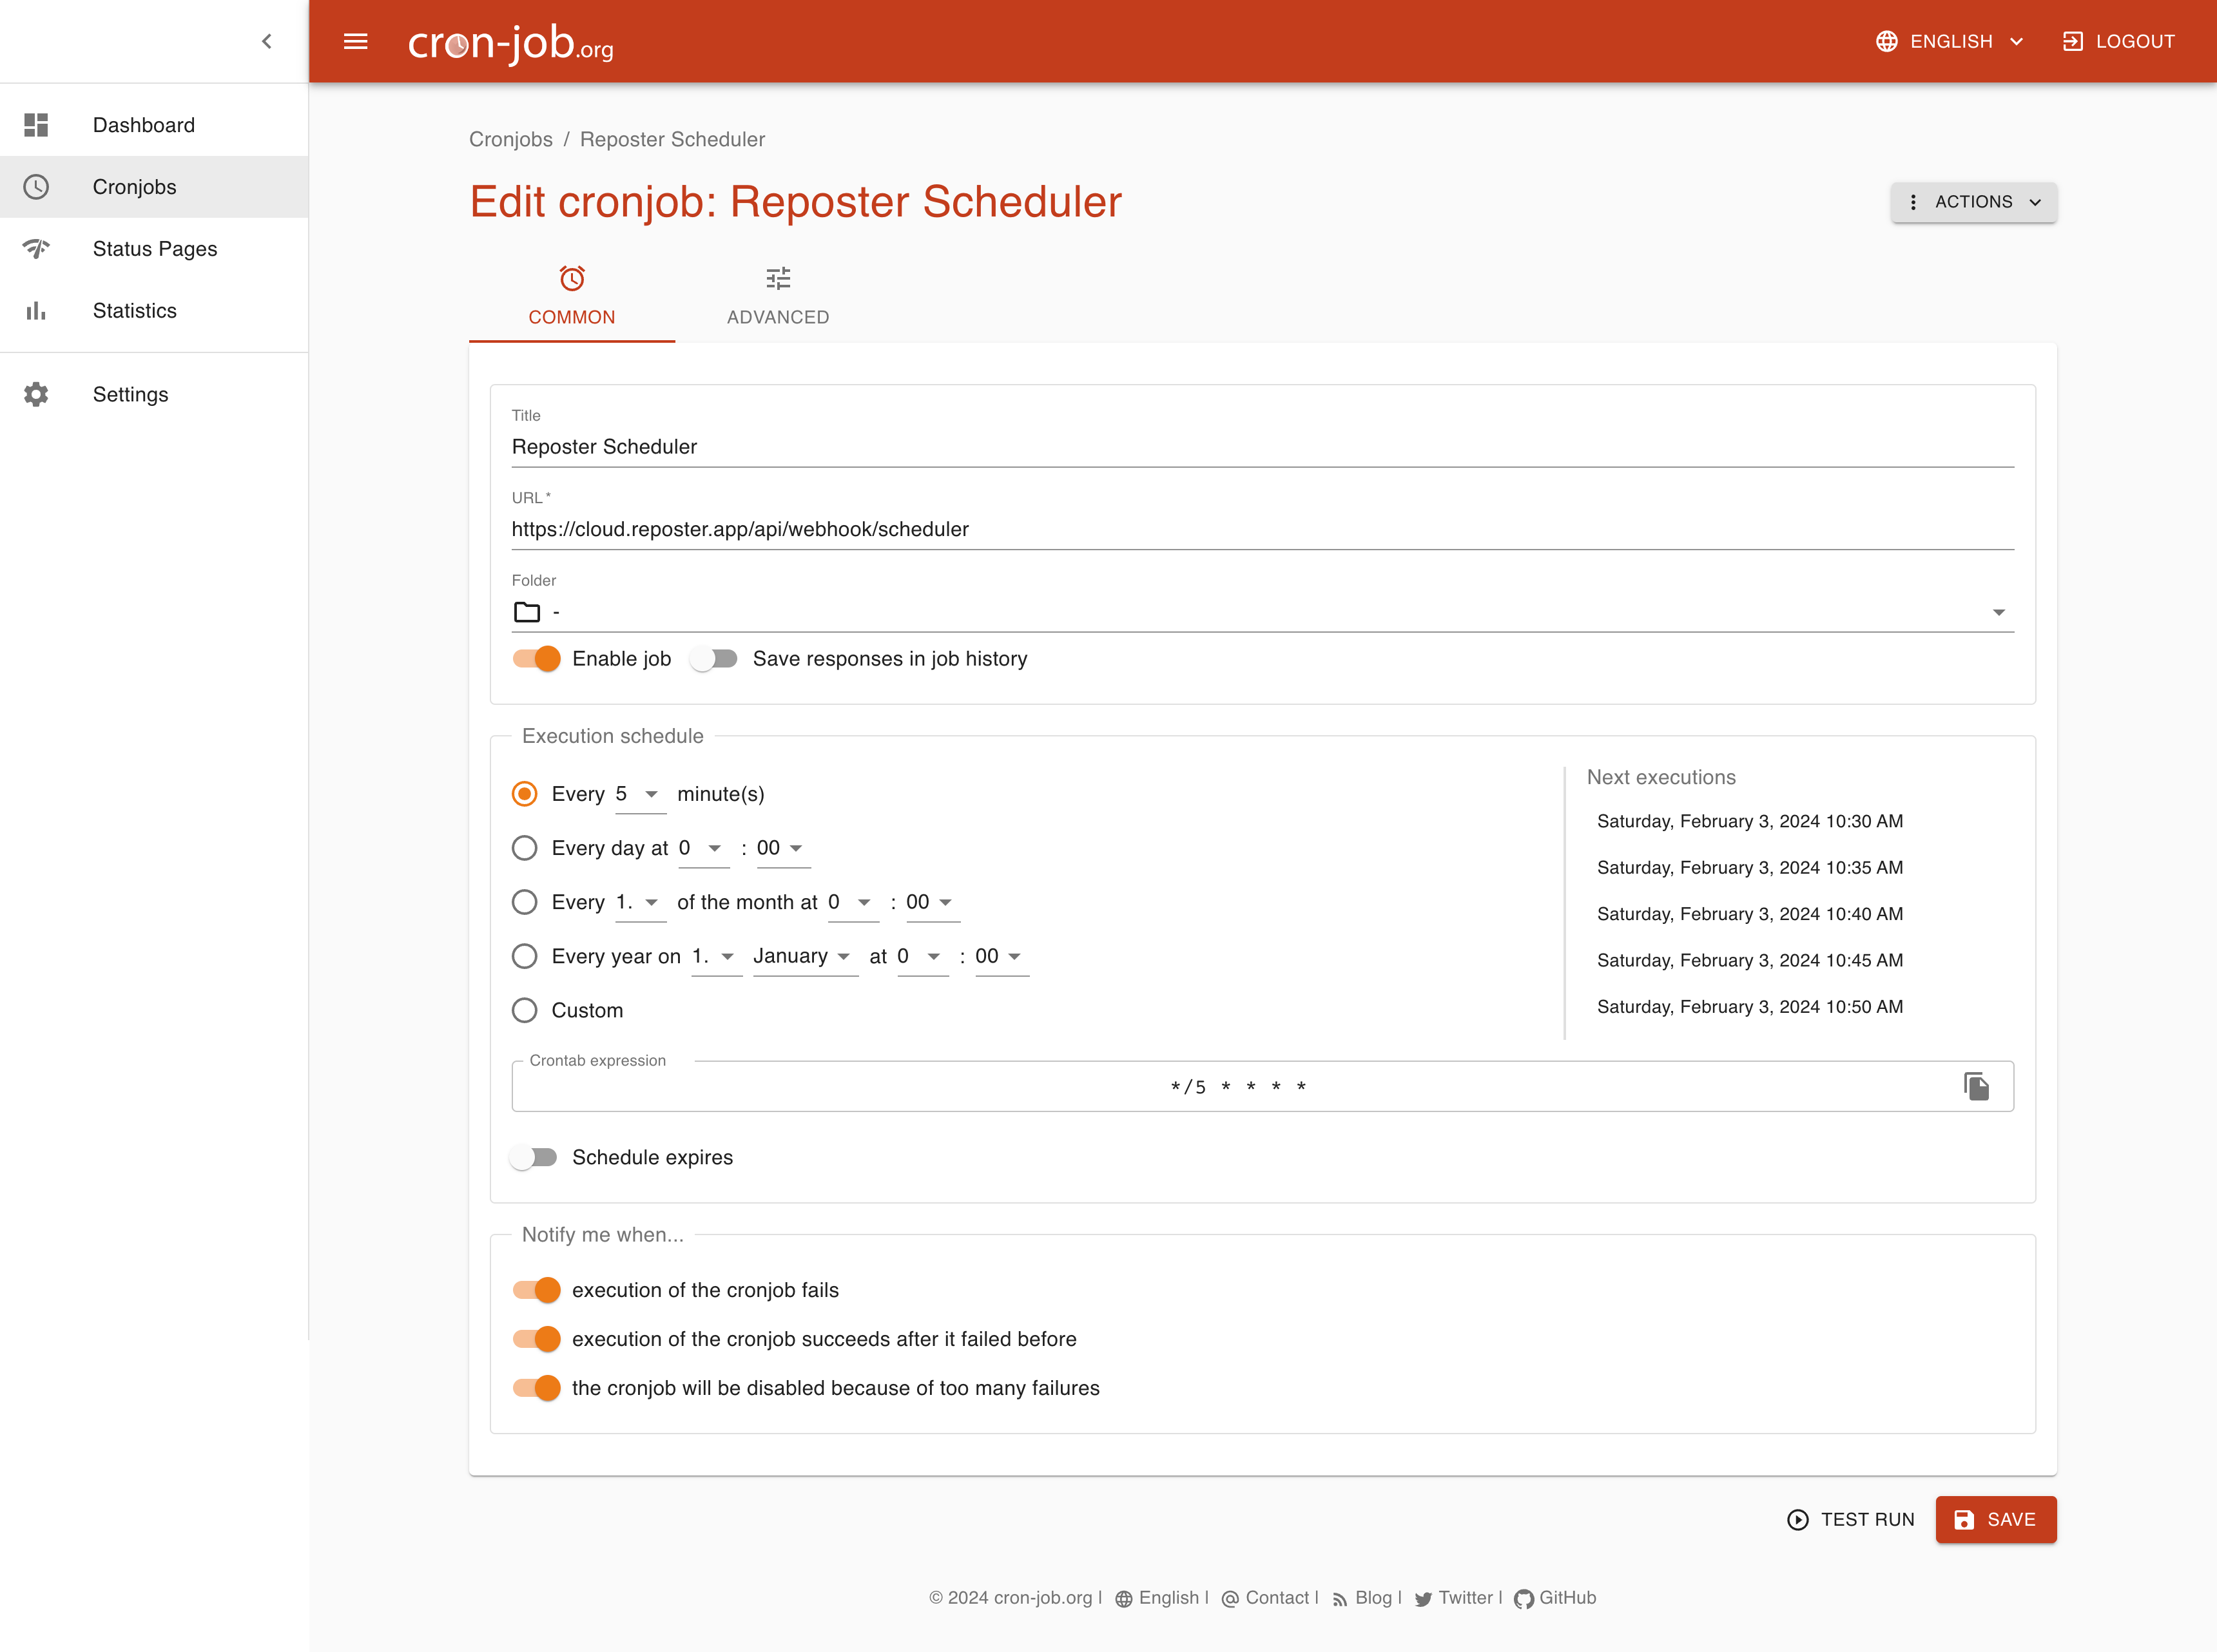
Once signed up, create a POST request that runs every 5 minutes for example, that point to the application url setup on Vercel (like: https://cloud.reposter.app/api/webhook/scheduler).
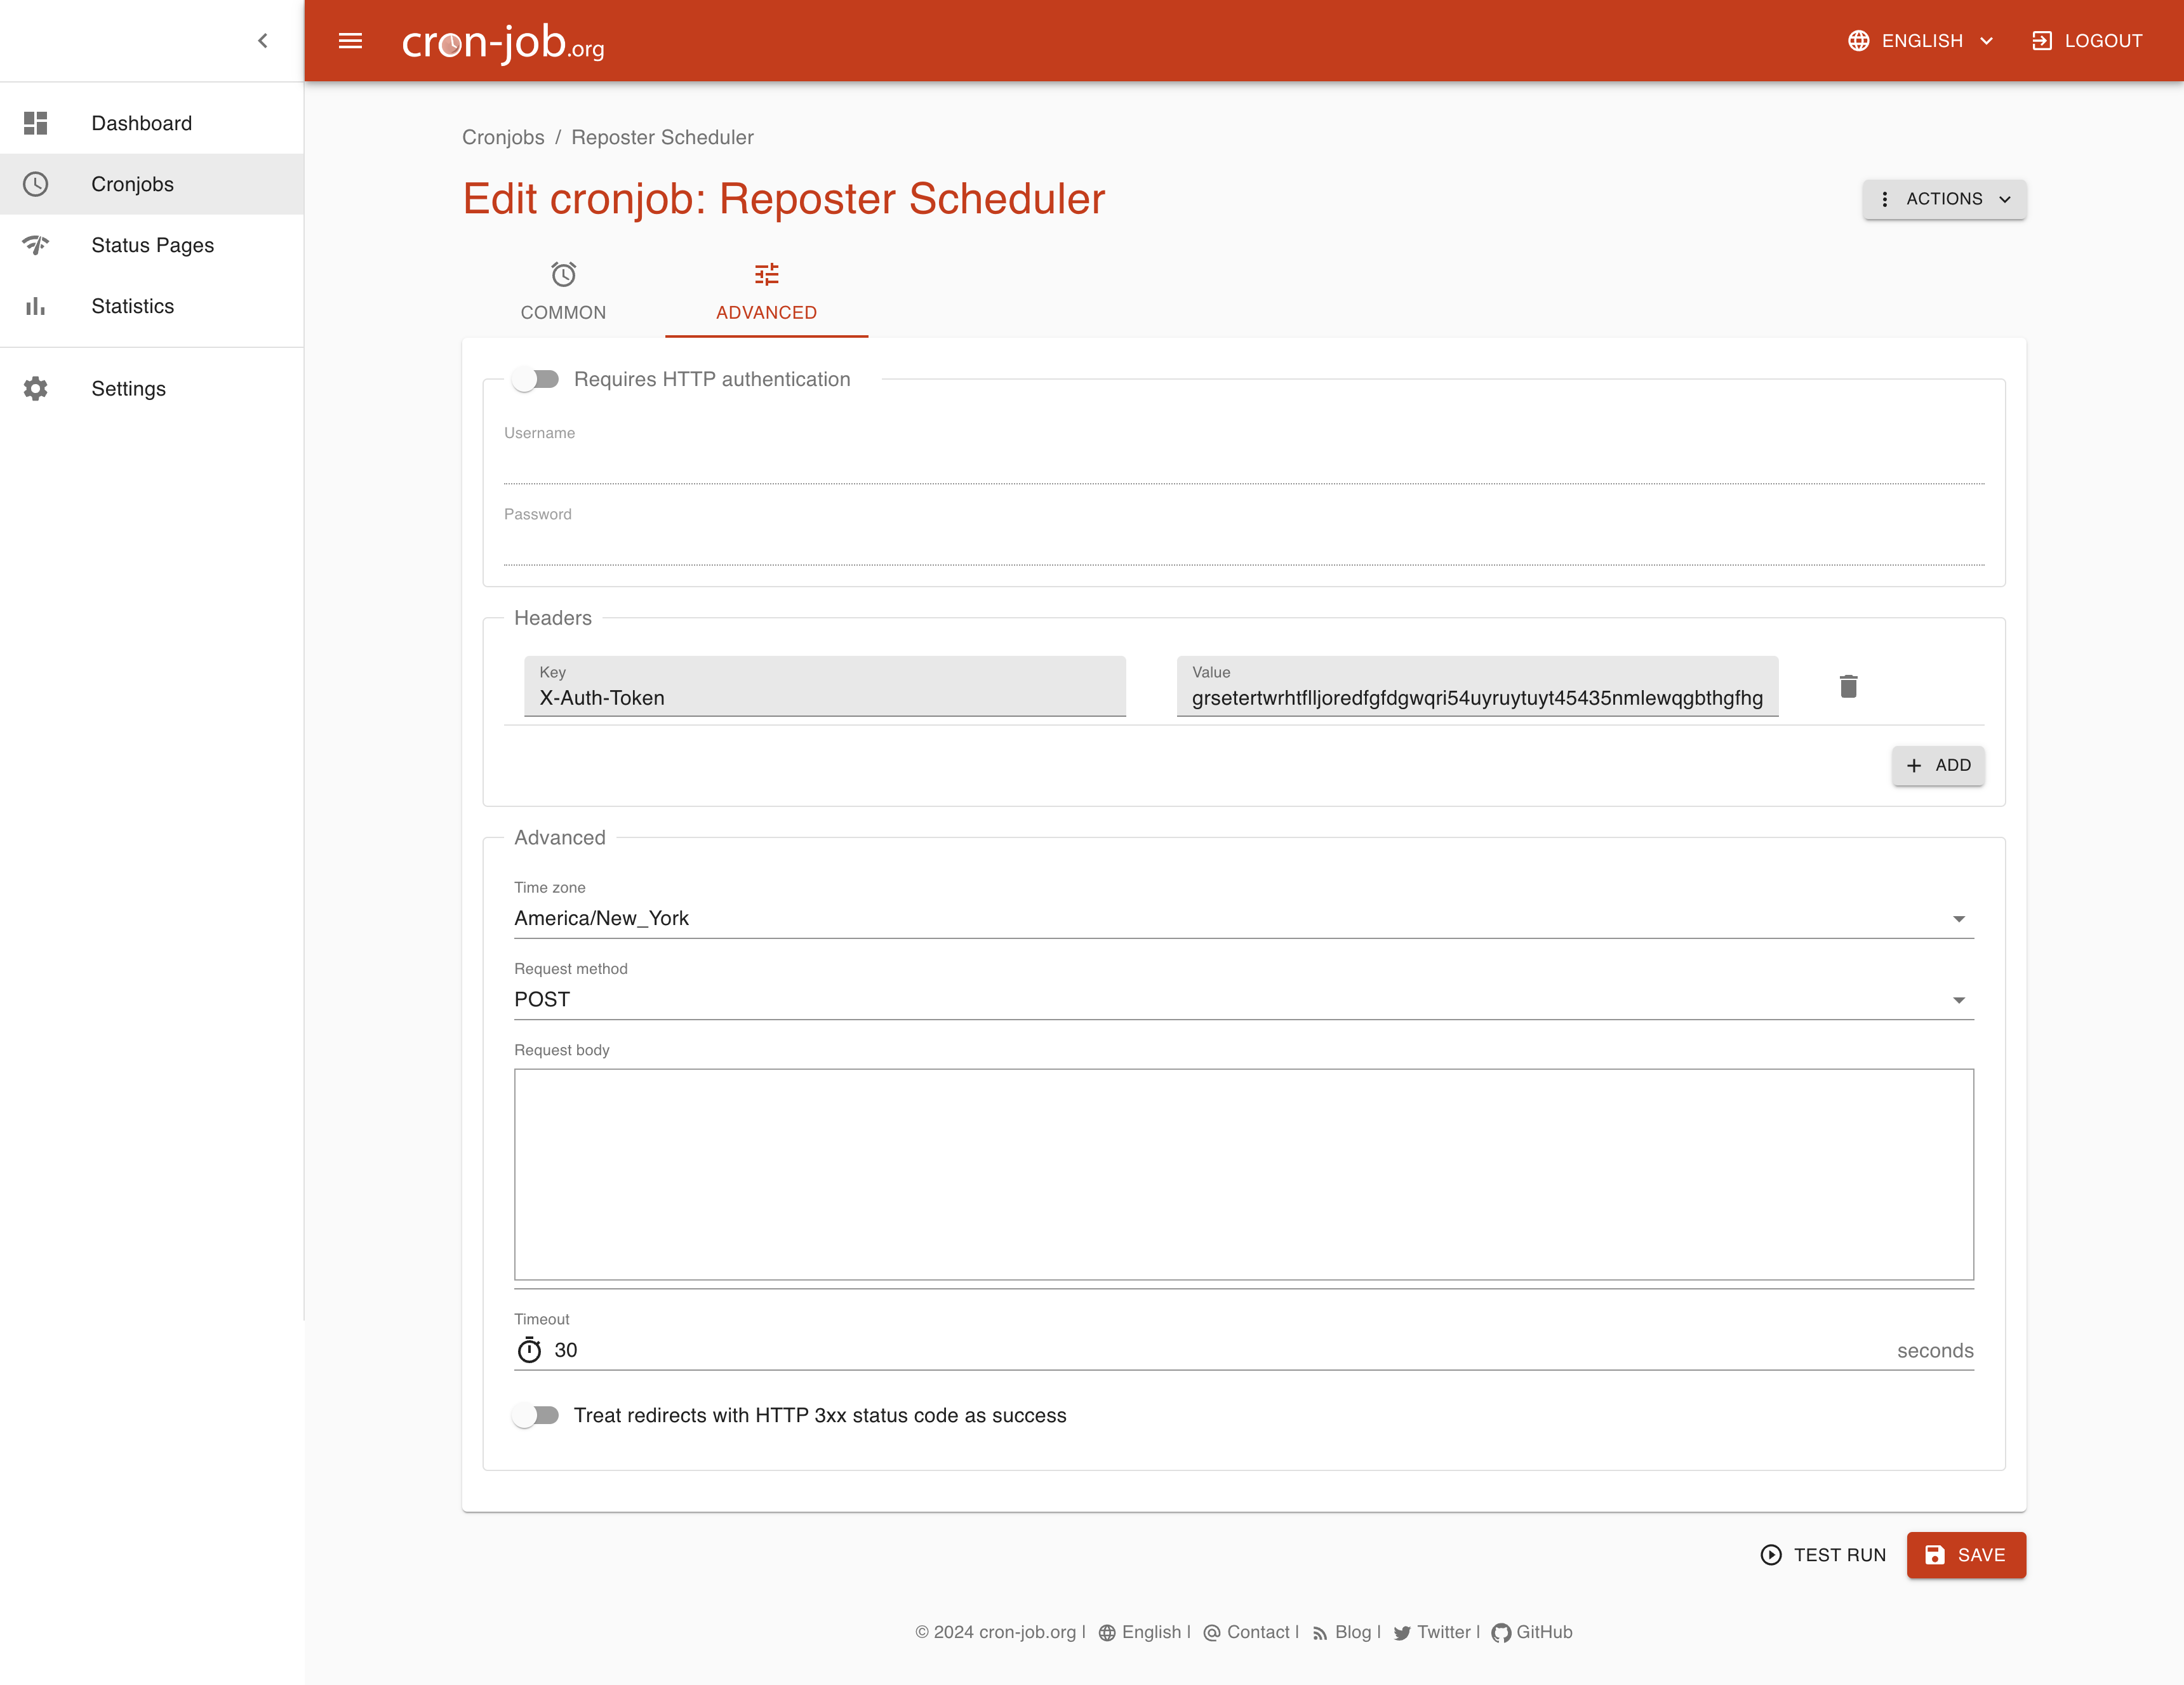
Then click on the "Advanced" tab and set a custom header:
X-Auth-Token with the value you defined in the SCHEDULE_SECRET variable.
Troubleshooting
If you see that your scheduled posts are not published:
- Check if the cron job works. If you are using
https://cron-job.org, you can set it to send an email if it doesn't receive a 200 response - If you have hosted your application on Vercel, remember that the
/api/webhook/schedulerendpoint must respond within 5 seconds. This means that if you have a post with huge images attached, maybe it can be killed - Try to publish the post manually and check the popup error.
- If you get a
Failed to publish post: Request failed with code 429, it means that you have finished your daily quota and you must wait. - Check your MongoDB database, the
ErrorLogcollection and check what happened.- For example, you'll find you rate limit and your next reset date by looking at:
body -> rateLimit -> day -> resetThis is a unix timestamp - Also check at the
body -> datato check the type of error
- For example, you'll find you rate limit and your next reset date by looking at:
- If you get a
LINIEDIN:
https://www.linkedin.com/developers/apps/new